Follow Me On Social Media!
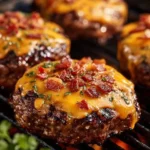
Ultimate Cheesy Ground Beef Melt
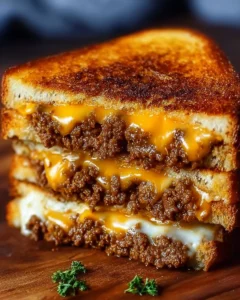
When you want a warm, cheesy meal that fills you up and makes you smile, the Ultimate Cheesy Ground Beef Melt hits the spot. It tastes like a grilled cheese and a hearty burger had the best kind of food baby. You get juicy beef, soft onions, and garlic, all held together with melted cheese between buttery, golden bread. Each bite has crunch from the toast and a creamy, savory center. It is simple. It is fast. It always satisfies.
This melt uses basic ingredients you likely already have. You only need one skillet, a knife, and a few minutes. The steps are easy, even if you are new to cooking. You brown the beef, stir in cheese, and grill the sandwich in the same pan. That is it. You do not need fancy tools or special techniques.
It works for busy weeknights, game day, or a cozy lunch at home. Kids love it. Adults love it. You can keep it classic or add your favorite toppings like pickles, mustard, or ketchup for extra flavor. You can make it as mild or as bold as you like. This is comfort food you can count on.
If you want a no-fuss, fast, and tasty meal, the Ultimate Cheesy Ground Beef Melt is a great choice. It is a crowd-pleaser and a budget-friendly favorite. Let’s walk through what makes it great and how you can make it perfectly every time.
Why You Should Make This Ultimate Cheesy Ground Beef Melt
- It is quick. You can make this melt in about 20 to 25 minutes from start to finish. Browning the beef does not take long, and the sandwich toasts in just a few minutes per side.
- It is simple. The steps are straightforward. You cook the beef with onion and garlic, melt in cheese, and grill the bread. Anyone can do it.
- It uses basic ingredients. Ground beef, onion, garlic, cheese, bread, and butter are pantry and fridge staples. You do not have to hunt for special items.
- It is budget-friendly. Ground beef and bread make a filling meal for less money than takeout. You can feed a family without breaking the bank.
- It tastes amazing. The blend of savory beef, sweet onion, garlic, and gooey cheese tucked inside buttery, toasted bread is comfort on a plate.
- It is flexible. Use cheddar or any cheese you like. Try different breads. Add pickles, mustard, or ketchup. Make it your own.
- It works for all ages. Kids love the cheesy, toasty goodness. Adults enjoy the rich flavor and hearty bite.
- It is great for beginners. You only need one skillet and a few simple steps. This melt helps new cooks feel confident.
- It is easy to scale. Double the beef mixture and make more sandwiches for a group. The method stays the same.
- It makes great leftovers (with a trick). The cooked beef and cheese mix holds well in the fridge. Reheat the filling and toast fresh bread when you are ready to eat.
How to Make Ultimate Cheesy Ground Beef Melt
You will cook the beef and aromatics in a skillet, stir in cheese until it melts, and then build the sandwich right in the same pan. To set yourself up for success, gather your tools and prep before you turn on the stove.
Helpful tools:
- A large skillet (nonstick, stainless steel, or cast iron)
- A cutting board and sharp knife
- A spatula (a wide one helps with flipping)
- A spoon for stirring
- A butter knife
- A cheese grater if you shred cheese yourself
- Paper towels (optional, for draining fat)
Basic plan:
- Brown the ground beef with diced onion and minced garlic. Season with salt and pepper.
- Take the skillet off the heat and stir in shredded cheese until it melts and coats the beef.
- Butter one side of each slice of bread.
- Build the sandwich in the skillet with the buttered side down and the beef mixture in the middle.
- Toast both sides until golden and crisp. Slice and serve with toppings.
Tips for smooth cooking:
- Pre-dice the onion and mince the garlic before you start.
- Let the butter sit out for a few minutes so it spreads easily.
- Shred cheese from a block if you can. It melts smoother than pre-shredded.
- Keep the heat at medium or medium-low when toasting the bread. This prevents burning and gives the cheese time to stay melty.
Ingredients for Ultimate Cheesy Ground Beef Melt
1 pound ground beef, 1 onion, diced, 2 cloves garlic, minced, 1 cup shredded cheese (cheddar or your choice), 4 slices of bread, 2 tablespoons butter, Salt and pepper to taste, Optional toppings: pickles, mustard, or ketchup
Simple notes:
- Ground beef: 80/20 or 85/15 makes a juicy, flavorful filling. Leaner beef works too.
- Onion: Yellow or white onion gives a nice balance of sweet and sharp.
- Garlic: Freshly minced garlic adds rich aroma. Use more if you like garlic.
- Cheese: Cheddar is classic. You can also use Monterey Jack, Colby Jack, mozzarella, provolone, or a blend.
- Bread: Use sturdy sandwich bread, Texas toast, sourdough, or even brioche. Thick slices toast well and hold the filling.
- Butter: Soften it a bit so it spreads easily.
- Salt and pepper: Season to taste as you cook the beef.
- Toppings: Pickles add crunch and tang. Mustard adds zip. Ketchup adds sweet tomato flavor.
Directions for Making Ultimate Cheesy Ground Beef Melt
- In a skillet over medium heat, cook the ground beef with diced onion and minced garlic until the beef is browned and cooked through. Season with salt and pepper. 2. Remove from heat and stir in the shredded cheese until melted. 3. Butter one side of each slice of bread. 4. In the same skillet, place a slice of bread, butter-side down, and spoon a portion of the cheesy beef mixture on top. 5. Top with another slice of bread, butter-side up. 6. Cook until golden brown on both sides, about 3-4 minutes per side. 7. Slice and serve warm with desired toppings.
How to Serve Ultimate Cheesy Ground Beef Melt
This melt tastes best hot from the skillet. The bread should be crisp and golden. The beef and cheese should be warm and gooey. Here are simple ways to serve it well:
-
Cut on the diagonal. A diagonal cut gives a neat cross-section of beef and cheese. It also makes the sandwich easier to hold and dip.
-
Add toppings right before serving. Slip in pickles for crunch. Add a swipe of mustard or ketchup on the inside of the bread or serve on the side.
-
Pair with a simple side. Great options include:
- Tomato soup for a classic combo
- A crisp green salad with a light vinaigrette
- Coleslaw for crunch and tang
- Potato chips or kettle chips
- Fries or tater tots
- Roasted vegetables like broccoli or carrots
- A cup of broth or a light vegetable soup
-
Offer dipping sauces. Try:
- Ketchup
- Yellow mustard or Dijon
- Spicy mustard
- Garlic aioli or mayo mixed with a little lemon
- Barbecue sauce for a smoky-sweet note
- Sriracha mayo if you like heat
-
Serve with a drink that fits the mood:
- Iced tea or lemonade
- Cola or ginger ale
- A cold beer like a lager or pale ale
- Sparkling water with lemon
- Hot coffee for a diner feel
-
Make it a platter. Serve halves with a pile of chips, a dill pickle spear, and a small bowl of ketchup or mustard. It looks inviting and keeps things simple.
-
Brunch twist. Add a fried or scrambled egg next to the sandwich. The soft yolk is great with the beef and cheese.
-
For kids. Cut into smaller triangles or squares. Serve with carrot sticks, cucumber slices, or apple wedges.
-
For a crowd. Keep finished sandwiches warm in a 200°F (95°C) oven on a rack over a sheet pan while you cook the next batch. This keeps them crisp.
How to Store Ultimate Cheesy Ground Beef Melt
You can store leftovers and enjoy them later. The best way is to store the beef mixture and the bread separately. This keeps the bread from getting soggy.
Refrigeration:
- Store the cooked cheesy beef mixture in an airtight container. Cool it to room temperature first, then refrigerate.
- It stays fresh for 3 to 4 days in the fridge.
- If you already built the sandwich, you can still refrigerate it. Wrap it in foil or place it in a container. Eat it within 1 day for the best texture. The bread will soften.
Freezing:
- The beef and cheese mixture freezes well.
- Cool it fully. Spoon into a freezer-safe bag or container. Press out extra air.
- Label with the date. Freeze for up to 2 to 3 months.
- Do not freeze assembled sandwiches. The bread gets soggy and the texture is not ideal.
Thawing:
- Thaw the frozen beef mixture in the fridge overnight.
- For a quick thaw, place the sealed bag in a bowl of cold water and change the water every 30 minutes until thawed.
Reheating:
- Skillet: Warm the beef mixture in a skillet over medium heat, stirring until hot and melty. Then build fresh sandwiches and toast as usual.
- Microwave (for the filling only): Heat the beef mixture in a microwave-safe bowl in short bursts, stirring often. Do not microwave the assembled sandwich if you want crisp bread.
- Oven or toaster oven (for assembled leftovers): Place the sandwich on a rack or baking sheet. Heat at 350°F (175°C) for 8 to 12 minutes, flipping once. This helps crisp the bread again.
- Air fryer: Heat an assembled sandwich at 350°F (175°C) for 4 to 6 minutes, flipping halfway, until hot and crisp.
Food safety:
- Reheat leftovers until steaming hot.
- Do not leave cooked food out for more than 2 hours at room temperature.
- Discard leftovers that smell off or look questionable.
Tips for Making the Best Ultimate Cheesy Ground Beef Melt
- Choose the right beef. 80/20 or 85/15 ground beef gives the most flavor and juiciness. If you use lean beef, add a teaspoon of oil or a small pat of butter when cooking to help browning.
- Brown, don’t steam. Spread the meat out in the pan. Let it sit for a minute or two before stirring. This helps browning and builds flavor.
- Season as you go. Add a pinch of salt when the beef hits the pan, then taste and adjust at the end. Pepper blooms in the heat, so crack it in while cooking.
- Cook onions until tender. Give the onions time to soften and turn slightly golden. This sweetens them and balances the rich beef.
- Watch the garlic. Add garlic after the onion starts to soften and cook for about 30 to 60 seconds. Garlic burns fast. You should smell it bloom, not see it brown.
- Consider draining excess fat. If your beef renders a lot of fat, tilt the pan and spoon off some. Leave a little for flavor and to help melt the cheese.
- Shred your own cheese. Freshly shredded cheese melts smoother than pre-shredded, which often has anti-caking powder.
- Remove from heat before adding cheese. Stir cheese into the hot beef off the burner. This prevents the cheese from splitting or getting greasy.
- Don’t overload the sandwich. Add enough beef to cover, but do not stuff it too high. An even layer helps the sandwich hold together and toast evenly.
- Butter the bread edge-to-edge. Cover the whole surface so the bread toasts evenly and does not burn at the edges.
- Control the heat for toasting. Use medium or medium-low heat. Slow toasting makes a deep, even golden crust and keeps the center hot.
- Use the right pan. Cast iron gives a great crust. Nonstick makes flipping easy. Either works well.
- Flip with care. Use a wide spatula and support the top with your hand or a second spatula if needed. Flip in one quick motion.
- Keep sandwiches warm. If making several, place finished sandwiches on a wire rack over a sheet pan in a 200°F (95°C) oven. The rack prevents sogginess.
- Add toppings at the end. Pickles, mustard, and ketchup stay bright and crisp if you add them right before serving.
- Try a lid trick. If you like extra melty cheese inside, cover the skillet for the last 30 seconds of toasting. The trapped heat helps melt without burning the bread.
- Let it rest briefly. After you pull the sandwich from the pan, wait 1 minute before slicing. The filling settles and the cheese stays inside.
- Clean up as you go. Wipe the counter while the sandwich cooks. Your kitchen stays tidy, and dinner still hits the table fast.
Variations for Ultimate Cheesy Ground Beef Melt
The Ultimate Cheesy Ground Beef Melt is great as-is, but you can change it to fit your taste. Try these ideas:
Cheese swaps and blends:
- Sharp cheddar for bold flavor
- Pepper jack for heat
- Provolone or mozzarella for stretchy melt
- Colby Jack for a mild, creamy mix
- Swiss for a nutty twist
Bread choices:
- Sourdough for tang and structure
- Texas toast for a thick, diner-style feel
- Rye for patty melt vibes
- Brioche for a soft, buttery bite
- Whole wheat for a hearty, nutty note
Flavor upgrades:
- Patty Melt style: Add extra sautéed onions and use Swiss on rye.
- Mushroom Swiss: Cook sliced mushrooms with the onions. Melt in Swiss.
- BBQ Bacon: Stir in a spoon of barbecue sauce. Add crisp bacon in the sandwich.
- Tex-Mex: Add a teaspoon of taco seasoning and use pepper jack. Serve with salsa.
- Philly-inspired: Add diced green bell pepper with the onion. Use provolone.
- Pizza Melt: Mix in a spoon of marinara and use mozzarella. Add a sprinkle of oregano.
- Spicy Kick: Add jalapeño slices or a pinch of red pepper flakes.
- Garlic Lovers: Add an extra clove of garlic and a dash of garlic powder.
Toppings and add-ins:
- Pickled jalapeños for heat and tang
- Caramelized onions for deep sweetness
- Banana peppers for zip
- Sliced tomato (add after cooking to keep bread crisp)
- Fresh herbs like parsley or chives sprinkled inside
Diet-friendly swaps:
- Gluten-free: Use gluten-free bread and check that your toppings are gluten-free.
- Low-carb: Skip bread and spoon the cheesy beef over a bed of lettuce or roasted vegetables. Or make chaffles (egg and cheese waffles) and use them as the “bread.”
- Dairy-free: Use a plant-based cheese that melts well and a dairy-free butter or oil.
- Vegetarian: Use plant-based ground “beef,” or finely chop and sauté a mix of mushrooms and walnuts for a rich, meaty texture.
Format changes:
- Open-faced melt: Toast bread, pile on the hot beef and cheese, and broil for 1 to 2 minutes until bubbly.
- Sliders: Use small rolls and make mini melts for parties.
- Wrap it: Use a tortilla. Fill with the beef and cheese, fold, and griddle until crisp on both sides.
Seasoning ideas:
- Add Worcestershire sauce (1 teaspoon) for umami depth.
- Stir in smoked paprika for a gentle smoky note.
- Add a squeeze of Dijon mustard to the beef for sharpness.
Frequently Asked Questions About Ultimate Cheesy Ground Beef Melt
-
Can I use lean ground beef?
Yes. Lean beef (90% or 93%) works. It will render less fat, so add a teaspoon of oil to help browning. Watch the heat so it does not dry out. Season well for flavor. -
What cheese melts best?
Cheddar, Monterey Jack, Colby Jack, provolone, and mozzarella all melt well. Use freshly shredded cheese for the smoothest melt. -
Why did my bread burn before the sandwich heated through?
The heat was too high. Lower the heat to medium or medium-low. Toast slowly to let the inside warm up while the outside turns golden. Also, butter the bread edge-to-edge so it browns evenly. -
Can I make this ahead of time?
You can cook the beef mixture ahead and store it in the fridge for 3 to 4 days or freeze it for up to 2 to 3 months. Reheat the filling and build fresh sandwiches when you want to eat. Assembled sandwiches do not hold their crispness if stored. -
Can I skip the onion or garlic?
Yes. The melt will still taste good. If you skip both, consider adding a little onion powder or garlic powder to the beef for flavor. -
How do I keep the sandwich from falling apart?
Do not overfill it. Spread an even layer of beef and cheese. Use sturdy bread. Press gently with the spatula while it toasts. Let it rest for 1 minute before slicing. -
Can I drain the beef fat?
Yes. If there is a lot of fat, tilt the skillet and spoon off excess after the beef browns. Leave a little for flavor and to help the cheese coat the meat. -
What if my cheese gets oily or separates?
You may have heated it too much. Add the cheese off the heat and stir just until it melts. Use freshly shredded cheese for the best texture. -
Can I use a griddle or sandwich press?
Yes. A flat griddle is great for making multiple melts at once. A sandwich press or panini maker works too. Still butter the bread and watch for a golden crust. -
What bread works best?
Use bread that is not too soft or thin. Sourdough, Texas toast, rustic white, or brioche hold up well. Thick slices give a nice crunch and keep the filling in place. -
How much salt should I add?
Start with a small pinch when you add the beef to the skillet. Taste the cooked beef and add more salt and pepper at the end. The cheese also adds salt, so season lightly at first. -
Can I add vegetables?
Yes. Good options include mushrooms, bell peppers, or spinach. Sauté them with the onions until tender, then add the beef. Avoid very wet vegetables that could make the sandwich soggy unless you cook off the moisture. -
Can I use turkey or chicken instead of beef?
Yes. Ground turkey or chicken work well. Add a spoon of oil since they are lean. Season a bit more and cook fully until no pink remains. -
How do I keep the bread crisp if I add ketchup or mustard?
Spread condiments in a thin layer. Add them right before serving. Or serve them on the side for dipping. -
Can I make it spicy?
Yes. Use pepper jack cheese, add jalapeños, or mix in red pepper flakes or hot sauce with the beef. -
How do I reheat leftovers without losing crispness?
Use an oven, toaster oven, or air fryer. Heat at 350°F (175°C) until the bread is crisp and the filling is hot. Avoid microwaving assembled sandwiches. -
What if I only have pre-shredded cheese?
It will still work. Pre-shredded cheese may not melt quite as smoothly because of anti-caking agents, but it will still be melty and tasty. -
Can I double the recipe?
Yes. Use a larger skillet or cook the beef in two batches so it browns well. Keep the first batch warm. Build and toast the sandwiches one or two at a time, or use a griddle. -
How do I prevent soggy bread?
Drain excess fat from the beef mixture. Keep the heat moderate so the bread crisps slowly. Serve right away. If holding, place the sandwich on a rack in a warm oven, not on a flat pan where steam can soften the bottom. -
What sides go best with this melt?
Tomato soup, a crisp salad, chips, fries, coleslaw, roasted vegetables, or a simple pickle spear are all great choices.
With these tips and answers, you can make the Ultimate Cheesy Ground Beef Melt with ease and confidence. It is simple, fast, and full of flavor. Enjoy the golden crunch, the savory filling, and that perfect cheesy pull every time you make it.
Print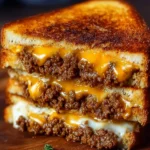
Ultimate Cheesy Ground Beef Melt
- Total Time: 25 minutes
- Yield: 4 servings 1x
- Diet: Non-Vegetarian
Description
A warm, cheesy meal combining juicy ground beef, soft onions, and garlic, all held together with melted cheese between buttery, golden bread.
Ingredients
Scale
- 1 pound ground beef
- 1 onion, diced
- 2 cloves garlic, minced
- 1 cup shredded cheese (cheddar or your choice)
- 4 slices of bread
- 2 tablespoons butter
- Salt and pepper to taste
- Optional toppings: pickles, mustard, or ketchup
Instructions
- In a skillet over medium heat, cook the ground beef with diced onion and minced garlic until browned. Season with salt and pepper.
- Remove from heat and stir in the shredded cheese until melted.
- Butter one side of each slice of bread.
- In the same skillet, place a slice of bread, butter-side down, and spoon a portion of the cheesy beef mixture on top.
- Top with another slice of bread, butter-side up.
- Cook until golden brown on both sides, about 3-4 minutes per side.
- Slice and serve warm with desired toppings.
Notes
This melt is quick, simple, and great for busy weeknights. Use different toppings and bread to customize it to your taste.
- Prep Time: 10 minutes
- Cook Time: 15 minutes
- Category: Main Course
- Method: Grilling
- Cuisine: American
Nutrition
- Serving Size: 1 sandwich
- Calories: 450
- Sugar: 2g
- Sodium: 800mg
- Fat: 22g
- Saturated Fat: 10g
- Unsaturated Fat: 10g
- Trans Fat: 1g
- Carbohydrates: 36g
- Fiber: 2g
- Protein: 25g
- Cholesterol: 70mg
Keywords: cheesy melt, ground beef, comfort food, easy recipe, quick meal