Follow Me On Social Media!
Skull Lava Cakes
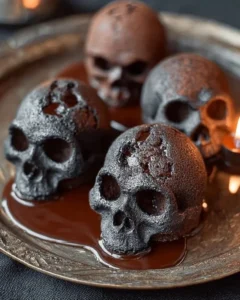
Imagine a dessert that looks spooky but tastes heavenly. Skull Lava Cakes are the perfect treat for Halloween parties, themed dinners, or any time you want to impress your family and friends. These little cakes have a rich and gooey center that flows out when you cut into them. They are warm, chocolaty, and just the right amount of decadent. The best part? They are easy to make! You don’t need to be a master baker to enjoy these delightful treats. With just a few simple ingredients and steps, you can create an impressive and delicious dessert that will have everyone coming back for seconds.
Why You Should Make This Skull Lava Cakes
You might wonder why you should try making Skull Lava Cakes. The reasons are plenty! First, they are incredibly quick to whip up. With a prep time of only about 15 minutes and a baking time of roughly 12-14 minutes, you can have these cakes ready to serve in less than half an hour. Perfect for last-minute gatherings!
Second, they are budget-friendly. The ingredients are simple and generally affordable. You may even have some of them at home already! A little butter, some eggs, and chocolate chips are all you need to create this gourmet dessert.
Another reason to make these Skull Lava Cakes is that they are great for any level of baker. Whether you are new to baking or have done it for years, you will find these cakes approachable. The step-by-step instructions guide you along the way, ensuring that you won’t feel lost or overwhelmed.
Finally, Skull Lava Cakes are versatile. You can enjoy them on their own or dress them up when serving. Pair them with ice cream, whipped cream, or fresh fruit, and you have a stunning dessert that looks and tastes like it came from a fancy restaurant.
How to Make Skull Lava Cakes
Making Skull Lava Cakes is straightforward, but a few important steps will ensure success. You will need some simple kitchen tools to make the process easier, like a microwave-safe bowl, a whisk, measuring cups, and the star of our recipe, skull-shaped silicone molds. These molds are key to creating the perfect shape for your cakes while ensuring they release easily after baking.
Next, gather all your ingredients as listed below. Make sure to measure everything out ahead of time, so you can move smoothly through the process without any unnecessary pauses.
Ingredients for Skull Lava Cakes
- 1/2 cup unsalted butter
- 1 cup dark chocolate chips
- 1 cup powdered sugar
- 2 large eggs
- 2 large egg yolks
- 1 teaspoon vanilla extract
- 1/2 cup all-purpose flour
- 1/4 teaspoon salt
- Skull-shaped silicone molds (for baking)
Let’s break down the ingredients a bit to help you understand them better. You need unsalted butter to control the saltiness of the recipe. Make sure your butter is at room temperature for easier mixing. Dark chocolate chips give the cakes a rich flavor; feel free to use semi-sweet if you prefer a sweeter taste. Powdered sugar adds the right sweetness while ensuring a smooth batter. The eggs and egg yolks provide moisture and richness, while the vanilla extract enhances the chocolate flavor. Finally, flour and salt tie everything together to create the structure of the cake.
Directions for Making Skull Lava Cakes
- Preheat the oven to 425°F (220°C).
- Grease the skull-shaped silicone molds with cooking spray.
- In a microwave-safe bowl, melt the butter and chocolate chips together until smooth.
- Stir in the powdered sugar until well combined.
- Whisk in the eggs, egg yolks, and vanilla extract until fully incorporated.
- Gently fold in the flour and salt until just combined.
- Pour the batter into the prepared molds, filling them about 2/3 full.
- Bake for 12-14 minutes until the edges are firm but the center is soft.
- Remove from the oven and let sit for 1 minute, then invert onto plates.
- Serve warm and enjoy the gooey center!
Now, let’s explore these steps in more detail to ensure your Skull Lava Cakes come out perfectly every time!
Step-by-Step Details
Step 1: Preheat the Oven
Start by preheating your oven to 425°F (220°C). This high temperature is crucial for creating that lava-like center. While your oven heats up, you can prepare the molds and mix the batter.
Step 2: Prepare the Molds
Take your skull-shaped silicone molds and spray them lightly with cooking spray. This step prevents the cakes from sticking and makes it easy to pop them out later. If you don’t have silicone molds, regular muffin tins can also work, but be sure to grease them well.
Step 3: Melt the Butter and Chocolate
In a microwave-safe bowl, combine the unsalted butter and dark chocolate chips. Microwave them in short bursts of 30 seconds, stirring in between until the mixture is smooth. Be careful not to overheat it, as chocolate can burn easily. This melted mixture will be the base for your batter, adding richness and flavor.
Step 4: Add the Powdered Sugar
Once your chocolate and butter mixture is smooth, add in the powdered sugar. Mix it well until no lumps remain. This step creates a sweet, glossy base for your batter.
Step 5: Incorporate the Eggs and Vanilla
Next, whisk in the two large eggs, two egg yolks, and one teaspoon of vanilla extract. Mixing these ingredients well is key to achieving a smooth batter. The eggs help bind everything together and create that ooey-gooey center we love in lava cakes.
Step 6: Fold in Flour and Salt
Now, gently fold in the 1/2 cup of all-purpose flour and 1/4 teaspoon of salt. Be careful not to overmix. You want to combine the ingredients just enough so that the flour disappears into the batter. Overmixing can lead to dense cakes rather than light and airy ones.
Step 7: Fill the Molds
Pour the batter into each mold, filling them about two-thirds full. This allows room for the cakes to rise without spilling over. Use a spoon or a ladle for control, ensuring an even distribution.
Step 8: Bake the Cakes
Place the molds in the preheated oven and bake for 12-14 minutes. Keep a close eye on them. You want the edges to be firm while the centers are still soft. This balance is key to achieving the lava effect.
Step 9: Cooling Time
Once done baking, remove the molds from the oven and let them sit for 1 minute. This waiting period allows the cakes to firm up slightly, making it easier to remove them from the molds.
Step 10: Serve and Enjoy
After the minute is up, carefully invert the molds onto plates. Gently tap or shake them to help release the cakes. Serve the Skull Lava Cakes warm for the best gooey center experience!
How to Serve Skull Lava Cakes
Serving Skull Lava Cakes can be just as fun as making them! Here are some delightful suggestions to elevate your dessert experience:
-
Pair with Ice Cream: A scoop of vanilla or mint chocolate chip ice cream works beautifully. The cold ice cream against the warm cake creates an amazing contrast.
-
Add Whipped Cream: A generous dollop of whipped cream on top adds a light and airy texture. You can also flavor the whipped cream with a touch of vanilla or cocoa powder to match the cake.
-
Fresh Berries: Strawberries, raspberries, or blueberries not only add color but also a fruity tartness that balances out the sweetness of the cake.
-
Chocolate Sauce: Drizzled chocolate sauce or caramel adds an extra layer of flavor. You can even sprinkle some sea salt on top for a delightful sweet-and-salty combo.
-
Presentation: For a spooky touch, dust the cakes with powdered sugar using a fine sieve to mimic skulls. You can also use candy eyes for a fun decoration that will make your dessert even more themed.
-
Plate It Up: For an elegant look, serve the cakes on white plates. The contrast will highlight the rich dark color of the cake, making it visually appealing.
How to Store Skull Lava Cakes
If you have any Skull Lava Cakes left, you will want to store them properly to maintain their deliciousness.
-
Refrigeration: Store the cooled cakes in an airtight container in the fridge. They will stay fresh for about 2-3 days. When ready to eat, simply reheat them in the microwave for about 30 seconds to restore their gooey center.
-
Freezing: If you want to keep them longer, you can freeze the cakes. Wrap each one tightly in plastic wrap, then place them in a freezer-safe bag or container. They can be frozen for up to a month. To enjoy, thaw them in the refrigerator overnight and reheat as mentioned above.
-
Room Temperature: If you plan to eat the cakes within a day, you can leave them at room temperature. Just make sure they are in an airtight container to prevent them from drying out.
Storing these cakes properly ensures you can enjoy them later without losing that delightful texture and warmth.
Tips for Making the Best Skull Lava Cakes
To ensure your Skull Lava Cakes turn out perfect every time, consider these expert tips:
-
Use Quality Chocolate: The flavor of the chocolate significantly impacts the taste of the cakes. Use high-quality dark chocolate for the best results.
-
Don’t Overbake: Watch closely as your cakes bake. Overbaking will result in a solid center instead of the desired gooeyness. Trust your oven timer, but also check if the edges appear firm.
-
Room Temperature Ingredients: Make sure your eggs and butter are at room temperature. This helps the batter mix more smoothly and promotes even baking.
-
Experiment with Flavors: Consider adding a pinch of espresso powder or a splash of orange zest for a fun twist. These additions enhance the chocolate flavor and add complexity.
-
Use Non-Stick Spray Generously: Even with silicone molds, using enough non-stick spray or butter can help prevent any sticking or tearing when releasing the cakes.
-
Practice Patience: Allowing the cakes to cool for a minute after baking is crucial. This helps them hold their shape when inverted, resulting in a better presentation.
-
Get Creative with Molds: If you can’t find skull-shaped molds, you can also use regular ramekins or muffin tins. The shape will change, but the taste remains delightful!
Variations for Skull Lava Cakes
While Skull Lava Cakes are delicious as is, there’s always room for creativity! Here are some fun variations you can try:
-
Add Nuts: If you love a little crunch, consider adding chopped walnuts or pecans to the batter for added texture.
-
Different Chocolates: Experiment with different types of chocolate. You could try a mix of dark and milk chocolate for a sweeter treat.
-
Flavored Extracts: Swap out vanilla extract for other flavors like almond or hazelnut for a unique touch.
-
Spiced Lava Cakes: Add a pinch of cinnamon or nutmeg for a warm spice flavor. These spices can elevate the chocolate experience.
-
Gluten-Free Option: Substitute the all-purpose flour with a gluten-free flour blend. The cakes should still turn out rich and delicious.
These variations will allow you to customize the recipe to suit your taste or dietary needs while maintaining the core concept of these delightful lava cakes.
Frequently Asked Questions About Skull Lava Cakes
Q1: Can I substitute dark chocolate for milk chocolate?
Yes, you can! If you prefer a sweeter taste, using milk chocolate instead of dark chocolate will work just fine. Just keep in mind that the gooey center may be slightly less rich.
Q2: What if my center is too runny?
If your cake is too runny, it may need a longer bake time. Be sure to check your cakes at the minimum baking time and adjust as necessary. Remember, you want firm edges but a soft center.
Q3: Can I make these cakes ahead of time?
Absolutely! You can prepare the batter ahead of time and store it in the fridge for up to 24 hours. Just stir it again before pouring it into the molds and baking. You can also bake them ahead and reheat them when ready to serve.
Creating these Skull Lava Cakes is a fun and rewarding baking adventure that results in a decadent treat. Whether you are celebrating Halloween or simply craving some chocolatey goodness, this recipe is sure to please. Happy baking!
Print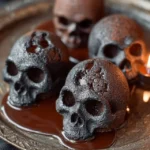
Skull Lava Cakes
- Total Time: 29 minutes
- Yield: 4 servings 1x
- Diet: Vegetarian
Description
Spooky yet heavenly, these Skull Lava Cakes are perfect for Halloween parties with a rich, gooey chocolate center.
Ingredients
Scale
- 1/2 cup unsalted butter
- 1 cup dark chocolate chips
- 1 cup powdered sugar
- 2 large eggs
- 2 large egg yolks
- 1 teaspoon vanilla extract
- 1/2 cup all-purpose flour
- 1/4 teaspoon salt
- Skull-shaped silicone molds (for baking)
Instructions
- Preheat the oven to 425°F (220°C).
- Grease the skull-shaped silicone molds with cooking spray.
- In a microwave-safe bowl, melt the butter and chocolate chips together until smooth.
- Stir in the powdered sugar until well combined.
- Whisk in the eggs, egg yolks, and vanilla extract until fully incorporated.
- Gently fold in the flour and salt until just combined.
- Pour the batter into the prepared molds, filling them about 2/3 full.
- Bake for 12-14 minutes until the edges are firm but the center is soft.
- Remove from the oven and let sit for 1 minute, then invert onto plates.
- Serve warm and enjoy the gooey center!
Notes
Pair with ice cream, whipped cream, or fresh fruit for an enhanced dessert experience.
- Prep Time: 15 minutes
- Cook Time: 14 minutes
- Category: Dessert
- Method: Baking
- Cuisine: American
Nutrition
- Serving Size: 1 cupcake
- Calories: 350
- Sugar: 30g
- Sodium: 150mg
- Fat: 22g
- Saturated Fat: 12g
- Unsaturated Fat: 10g
- Trans Fat: 0g
- Carbohydrates: 40g
- Fiber: 2g
- Protein: 6g
- Cholesterol: 180mg
Keywords: lava cake, chocolate dessert, Halloween treat