Follow Me On Social Media!
Skellington Cheese Ball Appetizer Recipe
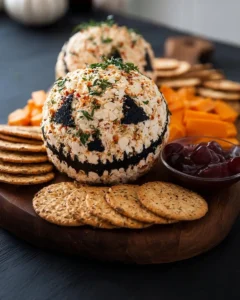
This Skellington Cheese Ball Appetizer Recipe is fun, creamy, and perfect for parties. It looks like Jack Skellington, so it fits right in at Halloween, movie nights, or any themed celebration. You make a smooth cheese ball, chill it until firm, and decorate the face with olives. The look is playful, and the taste is rich and satisfying.
You only need a few simple ingredients. It takes just a few minutes to mix, shape, and chill. You can make it ahead, which makes hosting easier. Guests love it because it is tasty, eye-catching, and easy to eat with crackers or veggies. You can place it on a platter and let everyone dig in. It brings smiles, but it also brings real flavor.
The texture is silky from cream cheese and bold from white cheddar. Garlic powder and onion powder add gentle depth. Black pepper gives a little kick. The black olives make the spooky face come alive. Kids can help decorate. Adults enjoy the smooth, savory bite. This is a no-stress, no-bake appetizer that sets the tone for a great gathering.
Why You Should Make This Skellington Cheese Ball Appetizer Recipe
- It is easy. You simply mix, shape, chill, and decorate. No stove. No oven. No special skills. If you can stir, you can make this.
- It looks amazing. The Skellington face is playful and bold. It becomes a centerpiece on your snack table. It also doubles as a conversation starter.
- It tastes great. Creamy cream cheese and sharp white cheddar create a balanced, savory flavor. The garlic and onion powders make the taste fuller without overpowering the cheese.
- It is budget-friendly. The ingredient list is short. You use common items you can find at any store. You get a big impact with a small spend.
- It is a crowd-pleaser. Cheese and crackers always work at a party. Guests of all ages usually enjoy a mild, creamy cheese spread.
- It is make-ahead friendly. You can make the cheese ball the day before your event. You simply add the olive face right before serving. This reduces stress on the day of the party.
- It fits many diets. It is naturally vegetarian (no meat in the base recipe). It is gluten-free when you serve it with gluten-free dippers. It is also low-carb and keto-friendly if you use veggie sticks or low-carb crackers.
- It is safe and sturdy on the table for a short time. You can leave it out for up to 2 hours at room temperature while guests arrive and snack. Then return it to the fridge.
- It is flexible. You can change the spice level. You can fold in herbs or a little heat. You can tweak the decoration or shape. You can even make mini versions for personal plates.
If you want a dish that is simple, reliable, and fun, this Skellington Cheese Ball Appetizer Recipe checks every box. It saves time. It looks festive. It tastes delicious. You will use it every Halloween season and beyond.
How to Make Skellington Cheese Ball Appetizer Recipe
The process is quick and clear. You mix the cheeses with spices. You shape the mixture into a ball. You chill it so it firms up. Then you decorate the Skellington face with olives and serve.
Tools you need:
- A large mixing bowl
- A sturdy mixing spoon or spatula
- Plastic wrap
- A plate or platter for serving
- A small knife for cutting olives
- Paper towels to blot olives dry
- Measuring spoons and a measuring cup
- Optional: disposable gloves to keep the surface smooth while shaping
Work on a clean counter. If the cream cheese is cold, let it soften at room temperature for about 20 to 30 minutes. This step makes mixing much easier. Shred the cheddar if you bought it in a block. Freshly shredded cheese melts into the cream cheese better and gives a smoother texture.
After mixing, chill the ball wrapped in plastic. Chilling helps it hold its shape. When it is firm, you can add the olive eyes, nose, and mouth. If you want crisp lines and a neat face, dry the olives before placing them so they do not slide. Then place the cheese ball on a platter with crackers, pretzels, and vegetables.
Ingredients for Skellington Cheese Ball Appetizer Recipe
- 2 cups cream cheese (softened)
- 2 cups shredded white cheddar cheese
- 1 teaspoon garlic powder
- 1 teaspoon onion powder
- 1/2 teaspoon black pepper
- Black olives for decoration
- Choosing the best ingredients makes a huge difference!
- I make sure to use fresh cream cheese and cheddar. The garlic and onion powders add delicious flavor
- Black olives are perfect for creating Skellington’s face features.
Notes:
- Cream cheese should be softened for easy mixing.
- Shred white cheddar fresh for the best texture.
- Use whole, pitted black olives so you can slice and shape them for the eyes and mouth.
- You can use regular or large black olives. Larger olives make bold features.
Directions for Making Skellington Cheese Ball Appetizer Recipe
- Mix cream cheese and cheddar in a bowl.
- Add garlic powder, onion powder, and pepper. Mix well.
- Shape the mixture into a ball.
- Wrap with plastic and chill for 1 hour.
- Use olives to make eyes, nose, and mouth.
- Place on a platter to serve.
- I find blending the cheeses well helps everything stick together.
- Chilling it gives the cheese ball time to firm up, making it easier to decorate.
- Using olives to create Skellington’s features is so fun!
How to Serve Skellington Cheese Ball Appetizer Recipe
Serving is where this appetizer shines. You can set it on a large platter and add all your favorite dippers around it. Keep the look simple and a little spooky, or go bright and colorful. Both styles work well.
Great dippers:
- Crackers: butter crackers, wheat crackers, seeded crackers, gluten-free crackers
- Bread: sliced baguette, crostini, pita chips
- Pretzels: mini pretzels, pretzel sticks, pretzel crisps
- Veggies: carrot sticks, celery sticks, cucumber rounds, bell pepper strips, cherry tomatoes, snap peas, radishes
- Extras: breadsticks, rice crackers, endive leaves, apple slices (tart apples pair nicely)
How to set up the platter:
- Place the Skellington cheese ball in the center of a round or oval platter.
- Add a ring of crackers around the ball.
- Fill the gaps with bright vegetable sticks to add color.
- Place a small knife or spreader next to the cheese ball so guests can serve themselves.
- If the party is large, add a second pile of crackers in another spot on the table so people do not crowd the platter.
Make it theme-friendly:
- Use a black or white platter to match the Skellington theme.
- Add a few sprigs of rosemary or thyme around the base to look like “spooky twigs.”
- If you wish, draw light “stitch” marks on the platter using balsamic glaze. Keep it thin so it does not touch the cheese.
- For a Halloween table, scatter a few plastic spiders or small pumpkins around the platter (not on the food).
- Use black cocktail napkins to match the look.
Portion and timing tips:
- Plan about 2 to 3 tablespoons of cheese per guest if you have many other snacks.
- For a smaller spread, plan about 1/4 cup per person.
- Set the cheese ball out 15 to 20 minutes before guests arrive so it slightly softens and spreads easily.
- Do not let it sit out longer than 2 hours. After that, return it to the fridge.
Drink pairings:
- White wine: Pinot Grigio, Sauvignon Blanc, or a lightly oaked Chardonnay
- Red wine: Pinot Noir or a smooth Merlot
- Beer: Pilsner, Kölsch, golden ale, or a light pale ale
- Cocktails: gin and tonic, vodka soda with lime, or a light spritz
- Non-alcoholic: sparkling water with citrus, apple cider, or iced tea
If you want to serve this Skellington Cheese Ball Appetizer Recipe as part of a bigger snack board, add nuts (if allergies are not a concern), dried fruits, fresh grapes, cured meats, and pickles. The creamy cheese pairs well with salty and tangy items.
How to Store Skellington Cheese Ball Appetizer Recipe
Storing this cheese ball is simple. Keep it cold and covered to protect the texture and flavor.
Refrigeration:
- Wrap the cheese ball tightly in plastic wrap. Press the wrap right against the surface so there is no air pocket.
- Place the wrapped ball in an airtight container if possible. This prevents fridge odors from affecting the cheese.
- Store for up to 3 to 4 days in the refrigerator.
- If you have already added the olive face, remove the olives before long-term storage. Olives can weep moisture and stain the white surface. You can reapply fresh olives before serving again.
Make-ahead:
- You can make the cheese ball up to 2 days ahead. Keep it wrapped and chilled.
- Decorate with olives just before serving for the neatest look.
- If the surface looks a little rough after chilling, smooth it with clean hands or with plastic wrap before adding the face.
Freezing (optional):
- You can freeze the undecorated cheese ball. Wrap it very tightly in plastic wrap, then in foil, or place it in a freezer-safe bag. Label it.
- Freeze for up to 1 month for best texture.
- Thaw in the refrigerator for 24 hours before serving. Do not thaw on the counter.
- After thawing, unwrap, pat the surface smooth, and decorate with olives.
- Note: Freezing can make cream cheese slightly grainy. Most people do not mind once it is mixed with cheddar, but fresh is always the smoothest.
Leftovers after serving:
- If the cheese ball has been at room temperature for less than 2 hours, you can rewrap and refrigerate it.
- If it sat out longer than 2 hours, it is safer to discard to avoid food safety risks.
- For the best quality, enjoy leftovers within 3 days.
Tips for Making the Best Skellington Cheese Ball Appetizer Recipe
- Soften the cream cheese. Soft cream cheese blends fast and smooth. Cold cream cheese makes mixing hard and can leave lumps.
- Shred your own cheddar. Pre-shredded cheese often has anti-caking starch. Freshly shredded cheddar mixes better and tastes sharper.
- Mix thoroughly. Stir until the texture is uniform and fluffy. Press the spoon or spatula against the bowl to mash any small lumps.
- Season evenly. Sprinkle the garlic powder, onion powder, and black pepper over the top before mixing. This helps spread the flavor throughout the cheese.
- Taste and adjust. Before you shape the ball, taste a tiny bit. If you want more kick, add a pinch more black pepper. If you prefer a stronger flavor, add a little more garlic or onion powder.
- Keep it white. For a classic Skellington look, do not add herbs or paprika to the base if you want a pure white surface. You can always add color on the sides with garnishes or on the platter.
- Shape with plastic wrap. Put the cheese mixture onto a piece of plastic wrap. Pull the edges up and twist to make a tight ball. This helps you form a smooth shape without sticky hands.
- Chill long enough. One hour is the minimum. If you have time, chill for 2 hours for a firmer ball. It will hold the face details better and slice cleaner on a cracker.
- Dry the olives. Pat olives with a paper towel so they stick and do not slide. If you need sharp lines for the mouth, cut olives into thin slices or half-moons.
- Plan the face first. Before placing olives, set them on the surface to test the layout. Adjust until you like the expression. Then press them in gently.
- Use a small knife. A paring knife gives you control when cutting olives. You can trim shapes to make the eyes oval and the mouth curved.
- Smooth the surface. After chilling and before decorating, use clean hands to smooth any dents. You can also press a piece of plastic over the surface and glide your hand over it to polish it.
- Use gloves for a neat finish. Light, food-safe gloves help keep the cheese clean and prevent fingerprints.
- Serve at the right temperature. Let the cheese ball sit out for 15 minutes before guests arrive. It will spread easily but still hold the face.
- Expand the spread smartly. Offer at least three types of dippers. Provide a mix of crunchy and fresh. Include a gluten-free option if needed.
- Make mini cheese balls. If you want individual servings, roll small balls and add tiny olive faces. This is great for kids or for a tray-passed appetizer.
- Double it for a crowd. For a big party, double the recipe and make one large Skellington or two medium ones. Keep one in the fridge and swap it out as the first one is eaten.
- Keep it safe. Do not leave it out longer than 2 hours. Return to the fridge to keep it fresh and safe.
Variations for Skellington Cheese Ball Appetizer Recipe
You can keep the classic version or try a twist. Here are simple, tasty ideas. If you change the base color, you can still reserve the front face area white and decorate the sides, or make a fully themed version and keep the Skellington shape with a white front.
Flavor add-ins (mix into the cheese before shaping):
- Spicy: Add 1/4 to 1/2 teaspoon cayenne pepper or crushed red pepper. Finely mince 1 small jalapeño (seeded) for a bright heat.
- Herb and chive: Add 2 to 3 tablespoons finely chopped chives and parsley. Keep herbs to the sides if you want a clean white face.
- Ranch style: Add 1 to 2 tablespoons dry ranch seasoning. Taste and adjust.
- Bacon and scallion: Fold in 1/2 cup finely chopped cooked bacon and 2 tablespoons sliced scallions. Keep the front white by pressing bacon bits mostly on the sides if you want a neat face.
- Sun-dried tomato and basil: Add 1/4 cup chopped soft sun-dried tomatoes and 1 to 2 tablespoons chopped basil. This adds a sweet, savory pop.
- Smoky paprika: Add 1 teaspoon smoked paprika for a deep, warm taste. Note: paprika will tint the mixture. For a Skellington face, keep the front plain and press the paprika mix around the back and sides.
Coatings (optional):
- Everything bagel seasoning: Roll the sides in the seasoning for crunch. Leave the front bare to keep the white face.
- Crushed pecans or almonds: Roll the sides lightly in nuts for texture (avoid for nut allergies).
- Crushed pretzels: Press crushed pretzels around the sides for a salty crunch.
- Fresh herbs: Press minced parsley or chives on the sides for a green edge.
Diet and preference swaps:
- Vegetarian: The base recipe is already vegetarian. Check that your cheese brands use vegetarian rennet if needed.
- Gluten-free: The cheese ball is gluten-free. Serve with gluten-free crackers, cucumber rounds, or celery sticks.
- Low-carb/keto: Serve with non-starchy veggies or low-carb crackers. This cheese ball is naturally low in carbs.
- Lactose-free: Use lactose-free cream cheese and a lactose-free white cheddar. Many brands offer these now.
- Dairy-free/vegan: Use dairy-free cream cheese and a vegan white cheddar. Texture varies by brand. Chill longer to help it firm up. Decorate as usual with olives.
- Low-sodium: Choose low-sodium cheeses and adjust the spices. You can cut the saltiness by using salt-free garlic and onion powders.
The classic Skellington Cheese Ball Appetizer Recipe is perfect as is. But you can adapt it to your taste, your diet, and your theme. Keep the front white for the iconic face, and have fun with flavors on the inside or around the sides.
Frequently Asked Questions About Skellington Cheese Ball Appetizer Recipe
-
Can I use a different cheese instead of white cheddar?
Yes. You can use Monterey Jack, mozzarella, or a mild provolone for a softer flavor. If you want a sharper taste, try Asiago or an aged white cheddar. Keep it white if you want the Skellington look. Avoid cheeses that are very wet or crumbly. If the mix gets too soft, add a little more shredded cheese and chill longer. -
Can I use pre-shredded cheese?
Yes, pre-shredded cheese works, but it can be a bit drier and does not blend as smoothly. Freshly shredded cheese melts into the cream cheese better. If you use pre-shredded, mix a little longer to get a smooth texture. Let the cream cheese soften well so the mixture combines easily. -
How far in advance can I make this cheese ball?
You can make it 1 to 2 days ahead. Wrap it tightly and keep it in the fridge. Add the olive face right before serving for the cleanest look. If you want to freeze it, freeze undecorated for up to 1 month, then thaw in the fridge and decorate. -
My cheese ball is too soft. What should I do?
Chill it. Cold helps it firm up. If it is still very soft after an hour, mix in a bit more shredded cheddar, then rewrap and chill again. Make sure your cream cheese was not too warm and that your ratio stayed close to the recipe. -
My cheese ball is too firm to spread. How do I fix that?
Let it sit at room temperature for 15 to 20 minutes before serving. If it is still quite firm, let it rest a bit longer. Do not microwave the whole ball, or the face may slide. Time and room temperature will soften it naturally. -
How long can it sit out at a party?
Keep it out for no more than 2 hours at room temperature. After that, return it to the refrigerator. You can bring it back out again later. This keeps it safe and fresh. -
What if I do not have black olives?
You can use sliced black olives from a can, or try small pieces of nori (seaweed), black sesame seeds pressed in a line, or thin strips of roasted red pepper for a different look. If you want a classic, olives are easiest and stick best. -
Can I double the recipe?
Yes. Simply double every ingredient. Mix in a large bowl. You can make one large Skellington or two medium ones. If you make a very large ball, chill a bit longer so it firms all the way through. -
How do I get a really smooth, white surface?
Use softened cream cheese, mix well, and shape inside plastic wrap. Chill, then smooth with clean hands or a piece of plastic over the surface. Keep herbs, nuts, or spices away from the front so it looks bright white. Dry the olives before placing them so they do not smudge the surface. -
What dippers work best for a mixed crowd with allergies or dietary needs?
Offer a few choices. Include gluten-free crackers, cucumber rounds, celery sticks, and baby carrots. Add a small sign noting “gluten-free crackers” or “nut-free platter” if that helps your guests. Keep nut toppings off the cheese ball to be safe. -
Can I make mini Skellington cheese balls?
Yes. Roll the mixture into small balls, about 1 to 2 inches wide. Chill them on a tray. Decorate with tiny olive pieces for eyes and a small mouth line. Serve them in mini cupcake liners or on a long platter for a cute, grab-and-go option. -
What if the olives slide when I try to decorate?
Pat olives dry with a paper towel before placing them. If the surface is too slick, chill the cheese ball a bit longer to firm it up. Press each olive piece gently but firmly so it sets in place.
This Skellington Cheese Ball Appetizer Recipe is simple, festive, and delicious. With these tips and answers, you can make it smooth, creamy, and picture-perfect every time. It will make your guests smile as soon as they see it, and it will keep them coming back for more once they taste it.
Print
Skellington Cheese Ball Appetizer
- Total Time: 70 minutes
- Yield: 8 servings 1x
- Diet: Vegetarian
Description
A fun and festive cheese ball appetizer that resembles Jack Skellington, perfect for Halloween and themed parties.
Ingredients
Scale
- 2 cups cream cheese (softened)
- 2 cups shredded white cheddar cheese
- 1 teaspoon garlic powder
- 1 teaspoon onion powder
- 1/2 teaspoon black pepper
- Black olives for decoration
Instructions
- Mix cream cheese and cheddar in a bowl.
- Add garlic powder, onion powder, and pepper. Mix well.
- Shape the mixture into a ball.
- Wrap with plastic and chill for 1 hour.
- Use olives to make eyes, nose, and mouth.
- Place on a platter to serve.
Notes
Soften the cream cheese for easy mixing. Freshly shred cheddar for best texture.
- Prep Time: 10 minutes
- Cook Time: 0 minutes
- Category: Appetizer
- Method: No-Bake
- Cuisine: American
Nutrition
- Serving Size: 1 serving
- Calories: 300
- Sugar: 3g
- Sodium: 350mg
- Fat: 24g
- Saturated Fat: 14g
- Unsaturated Fat: 8g
- Trans Fat: 0g
- Carbohydrates: 5g
- Fiber: 0g
- Protein: 10g
- Cholesterol: 40mg
Keywords: cheese ball, Halloween appetizer, party food, Skellington, no-bake, vegetarian