Follow Me On Social Media!
Oreo Cake Recipe
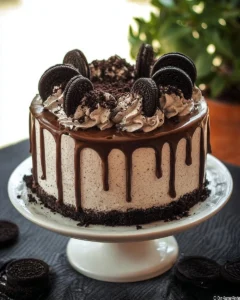
If you love Oreos and chocolate, this Oreo Cake Recipe will make you smile from the first bite. It is rich, soft, and full of cookies-and-cream flavor. You get moist chocolate cake layers, a smooth Oreo buttercream, and a glossy chocolate drip on top. It looks like a bakery cake, but you can make it at home with simple tools and a little patience.
This cake is great for birthdays, holidays, or any time you want to treat someone special. The layers stack tall and straight. The buttercream is light and silky. The chocolate drip adds a fun touch that makes everyone say “wow.” The taste is even better than it looks. Each slice gives you a deep cocoa cake with creamy frosting and that classic Oreo crunch.
You do not need fancy skills. You just follow clear steps. You cream butter and sugar, mix dry ingredients, and bake the cake. You make a smooth buttercream with egg whites and sugar, add butter and crushed Oreos, and whip it until fluffy. Then you build the cake and finish with a shiny drip. The steps are simple, and I will guide you through each one.
This Oreo Cake Recipe also teaches you helpful baking habits. You learn how to cream butter and sugar the right way. You learn how to make a stable Swiss meringue buttercream. You learn how to crumb coat a cake so it looks neat and clean. These skills will help you make many other cakes too.
Get ready to bake a cake that is soft, tidy, and full of Oreo flavor. It is fun to make and even more fun to eat. Let’s get started.
Why You Should Make This Oreo Cake Recipe
-
It is a crowd-pleaser. Everyone loves Oreos and chocolate. This cake combines both in a big, bold way. It looks special and tastes amazing, so it suits any celebration.
-
It uses simple pantry ingredients. Butter, sugar, eggs, flour, cocoa, chocolate, cream, and Oreos. You can find these in any store. You do not need rare items.
-
The steps are beginner-friendly. Each step is clear: cream, fold, bake, whip, assemble, finish. You learn as you go. If you can follow directions and measure well, you can make this cake.
-
The cake layers are moist and rich. The batter uses butter and eggs for structure and flavor. The cocoa gives deep chocolate taste. Baking powder helps the cake rise and gives a soft crumb.
-
The Oreo buttercream is silky and not too sweet. This recipe uses a Swiss meringue buttercream method. You heat egg whites and sugar, whip until glossy, then add butter. It is smooth, light, and stable. The crushed Oreos mix in perfectly and add real cookies-and-cream flavor.
-
You get a clean, professional finish. You will chill the cake, apply a crumb coat, and set it in the fridge. This locks in crumbs and gives a smooth base for your final frosting and drip. Your cake will look bakery-quality.
-
The chocolate drip adds drama. A drip always makes a cake look fancy. With a simple warm ganache (chocolate and cream), you get a shiny drip that sets as it cools.
-
It is easy to customize. You can add chopped Oreos between layers, change the drip chocolate, or use different Oreo flavors. You can decorate with whole or mini Oreos. It adapts to your style.
-
It holds up well. The cake is sturdy enough to stack. The buttercream is stable. You can make it ahead and keep it chilled. This lowers stress on party day.
-
It teaches core baking skills. Creaming, folding, egg white whipping, frosting, crumb-coating, and ganache drips are all classic skills. After this Oreo Cake Recipe, you will feel more confident with cakes in general.
-
It is budget-friendly for a showstopper. You avoid a pricey bakery order and still get a tall, impressive cake that feeds a crowd.
-
It tastes even better the next day. The flavors settle and blend after a night in the fridge. The cake stays moist, and the buttercream stays smooth.
If you want a dessert that is beautiful, reliable, and delicious, this Oreo Cake Recipe is the one to bake.
How to Make Oreo Cake Recipe
You will make this cake in five parts: cake layers, Oreo buttercream, assembly, chocolate drip, and final decor. The method is simple. You mix the cake batter, bake the layers, and let them cool. You make the buttercream with egg whites and sugar, whip until cool, add butter and Oreo crumbs, and set aside some for piping. You level your cakes, fill and stack them, chill the cake, then crumb coat and chill again. You finish with a chocolate drip and buttercream swirls.
Tools that help:
- Three 6-inch round cake pans
- Baking paper (parchment) and pan spray or butter to grease and line
- Two mixing bowls (one for dry ingredients, one for batter)
- Stand mixer with paddle and whisk attachments, or a hand mixer
- Heatproof bowl for the egg whites and sugar (fits over a pot of simmering water)
- Silicone spatula
- Offset spatula and bench scraper for frosting
- Cooling racks
- Serrated knife or cake leveler
- Piping bag with a star tip (for swirls)
- Microwave-safe bowl or small pot for the chocolate and cream
- Digital kitchen scale (helpful for accuracy)
- Instant-read thermometer (optional but helpful for heating egg whites and sugar)
Before you start, read the full Oreo Cake Recipe once. Pre-measure your ingredients. Bring butter and egg whites to room temperature for the buttercream. Line your pans and preheat your oven. When you prepare in advance, the process goes smoothly and you feel in control.
Ingredients for Oreo Cake Recipe
250g butter, 250g soft brown sugar, 1/2 tsp vanilla extract, 4 eggs, 160g flour, 90g cocoa powder (100%), 10g baking powder, 5 room temperature egg whites, 300g caster sugar, 452g room temperature butter, 1 teaspoon vanilla extract, 2 cup crushed Oreos into powder, 1 cup chocolate, 1/4 – 1/2 cup cream
Directions for Making Oreo Cake Recipe
- Make the chocolate cake layers: Cream the butter and sugar until pale and fluffy. Add vanilla and eggs one by one. Mix dry ingredients in a separate bowl, then fold into the batter. Divide into three greased and lined six-inch pans. Bake until a skewer comes out clean. Let cool., 2. Make the Oreo buttercream: Heat egg whites and sugar over simmering water until sugar dissolves. Whip until cool and glossy. Gradually add butter, vanilla, and Oreo crumbs. Set aside 1 cup for decoration., 3. Assemble the cake: Level cake layers, stack with buttercream in between, and chill. Apply a crumb coat and refrigerate again., 4. Make the chocolate drip: Heat chocolate and cream, then cool until pourable. Drip around the edges of the cake., 5. Finish the décor: Pipe buttercream swirls on top and add more Oreo cookies for garnish.
How to Serve Oreo Cake Recipe
This Oreo Cake shines at room temperature. Take it out of the fridge 30 to 60 minutes before serving. The buttercream will soften slightly and taste silky. The cake layers will taste richer and more chocolatey when not ice-cold.
Serving suggestions:
- Slice cleanly: Use a long, sharp knife. Warm the blade under hot water and wipe it dry between cuts. This keeps the slices neat and the layers tidy.
- Portion size: Since the cake is rich, thin slices work well. For a 6-inch, three-layer cake, you can cut 10–12 slices. For smaller, party-style wedges, aim for 12–14.
- Pair with a cool drink: Cold milk is a classic partner. Coffee or espresso balances the sweetness. Hot tea, like Earl Grey or mint, also pairs well. For kids, serve with chocolate milk for extra fun.
- Add a scoop: A small scoop of vanilla ice cream or cookies-and-cream ice cream turns a slice into a deluxe dessert. The cold ice cream and the soft cake feel great together.
- Add a drizzle: If you have leftover chocolate ganache, warm it gently and drizzle a little over each slice. You can also add a spoon of whipped cream.
- Fresh fruit on the side: Strawberries or raspberries cut through the richness. Keep it simple: a few berries on the plate look pretty and taste bright.
- A crunchy touch: Sprinkle a few extra crushed Oreos over each slice for a little crunch and a fun look.
Presentation tips:
- Wipe the cake board edges before serving so it looks clean.
- Pipe simple swirls on top in a circle for an even look. Place whole Oreos or halves in each swirl for a neat finish.
- If you like a minimalist look, smooth the sides and keep the top flat. Let the chocolate drip be the star.
With these small touches, your Oreo Cake Recipe will look and taste like a bakery dessert at your table.
How to Store Oreo Cake Recipe
This cake stores well and keeps its shape and flavor.
-
Short-term storage (1–2 days): Keep the cake covered in the fridge. Use a cake dome or an upside-down bowl. You can also chill it uncovered until the buttercream is firm, then wrap the cake loosely in plastic wrap without touching the decorations. Remove it from the fridge 30–60 minutes before serving to soften.
-
Medium-term storage (3–5 days): Store slices in airtight containers in the fridge. Place a small piece of baking paper between slices if stacking to prevent sticking. The cake will stay moist for up to 5 days.
-
Freezing the cake layers: You can bake the cake layers ahead of time. After they cool fully, wrap each layer tightly in plastic wrap, then in foil, and freeze for up to 2 months. Thaw in the fridge overnight, then bring to room temperature before frosting. This is a great time-saver.
-
Freezing a fully frosted cake: You can freeze the assembled cake without the drip and final decorations. Chill the cake until the buttercream is firm. Wrap it in plastic wrap and then foil. Freeze for up to 1 month. Thaw in the fridge overnight. Unwrap and let it sit at room temperature for 30–60 minutes. Add the chocolate drip and fresh decorations after thawing for the best look.
-
Freezing leftover slices: Wrap each slice in plastic wrap and place in a freezer bag or airtight container. Freeze for up to 1 month. Thaw in the fridge or at room temperature for 1–2 hours. The buttercream may sweat slightly as it warms; this is normal.
-
Reheating: Do not heat this cake in the microwave or oven once frosted. Heat will melt the buttercream. Instead, let slices sit at room temperature to soften.
-
Keeping it fresh: Avoid strong-smelling foods in the fridge. Buttercream absorbs odors. Keep the cake in a closed container or cake box.
With these storage steps, your Oreo Cake Recipe stays tender and tasty from the first slice to the last.
Tips for Making the Best Oreo Cake Recipe
Follow these expert tips to get perfect texture, flavor, and a clean finish.
-
Measure accurately: Use a digital kitchen scale for flour, cocoa, sugar, and butter. Accurate weights give consistent results and keep the cake moist but not dense.
-
Use room temperature ingredients: For the cake batter, bring butter and eggs to room temperature so they blend smoothly. For the buttercream, use room temperature butter and room temperature egg whites before heating with sugar. Cold ingredients can cause curdling or a lumpy batter.
-
Cream butter and sugar well: For the cake layers, beat butter and brown sugar until very pale and fluffy, about 3–5 minutes with a stand mixer. This traps air and helps the cake rise with a fine crumb.
-
Add eggs slowly: Add eggs one at a time, mixing each in fully before adding the next. This prevents the batter from splitting and keeps it smooth.
-
Sift dry ingredients: Cocoa powder often clumps. Sift the flour, cocoa, and baking powder together. This blends them and removes lumps for a smooth batter.
-
Fold gently: When you add dry ingredients to the batter, fold with a spatula until just combined. Do not overmix. Overmixing develops gluten and makes the cake tough.
-
Prepare your pans: Grease and line three 6-inch pans with baking paper on the bottom and sides. This makes the layers release cleanly. If you have baking strips, wrap them around the pans for even baking and flat tops.
-
Even layers: Weigh your batter and divide it evenly among the three pans. Even layers bake at the same rate and stack better.
-
Baking time and temperature: Preheat the oven to 350°F (175°C). For three 6-inch pans, start checking at 20–25 minutes. The cake is done when a skewer comes out clean or with a few moist crumbs. Do not overbake.
-
Cool completely: Let the cakes cool in the pan for 10–15 minutes, then turn them out onto racks. Cool completely before leveling and frosting. Warm cake will melt buttercream.
-
Make a stable Swiss meringue buttercream: Heat the egg whites and caster sugar over a pot of simmering water. Whisk constantly until the sugar dissolves and the mixture is warm to the touch and no longer gritty, about 160°F (71°C) if you use a thermometer. Then whip on high speed until the bowl feels cool and the meringue is glossy with stiff peaks. Add the room temperature butter a little at a time. If it looks soupy, keep whipping; it will come together. If it looks curdled, keep whipping; it will smooth out.
-
Add Oreos the right way: Crush Oreos into fine crumbs so they blend smoothly into the buttercream. Big chunks can clog a piping tip and create rough sides. Pulse in a food processor until you have powder with small flecks.
-
Save some buttercream for piping: Set aside about 1 cup of clean Oreo buttercream before you get crumbs on your spatulas. This ensures you have smooth buttercream for neat swirls on top.
-
Level and stack with care: Use a serrated knife to trim domes and make flat tops. Place the first layer on a cake board. Add an even layer of buttercream, spread to the edges, and repeat with the next layer. Press gently to keep the cake level.
-
Chill between steps: After stacking, chill the cake for 15–20 minutes. Apply a thin crumb coat to trap crumbs. Chill again for 15–20 minutes until set. Then apply the final coat. Chilling makes the process clean and stress-free.
-
Smooth sides and edges: Use an offset spatula to spread, and a bench scraper to smooth the sides while turning the cake on a turntable if you have one. Clean your scraper often for a polished finish.
-
Make a perfect drip: For the ganache, use 1 cup chocolate and 1/4–1/2 cup cream. More cream gives a thinner drip; less cream gives a thicker drip. Heat gently until smooth, then let it cool until it feels slightly warm, not hot. Test a drip on the side of a bowl. If it runs too fast, cool more. If it is too thick, warm it a few seconds.
-
Drip on a cold cake: Ensure your frosted cake is well chilled before you add the drip. A cold surface slows the drip and gives you control. Start with drips around the edge, then fill the top and smooth.
-
Decorate with intention: Pipe even swirls around the top edge. Add whole, half, or mini Oreos. You can also sprinkle a few Oreo crumbs in the center. Keep it simple for a clean, professional look.
-
Keep knives and tools clean: Wipe your offset spatula and bench scraper often. Clean tools make smooth frosting.
-
Plan your timing: Bake and cool layers early in the day. Make buttercream while the cakes cool. Assemble and chill. Add drip and decorations just before serving or a few hours ahead.
-
Fixing common buttercream issues:
- Too soft? Chill the bowl for 10 minutes, then whip again.
- Curdled? Keep whipping; it will come back together.
- Too stiff? Warm the bowl slightly with your hands or a warm towel and whip.
-
Transport with care: Chill the finished cake until firm. Place on a non-slip mat in the car. Keep it cool and level during transport.
These tips help you avoid common mistakes and make your Oreo Cake Recipe smooth, pretty, and delicious every time.
Variations for Oreo Cake Recipe
You can customize this Oreo Cake Recipe in many fun ways while keeping the core method the same.
-
Different Oreo flavors: Use Golden Oreos for a vanilla twist. Try Mint Oreos for a cool kick. Peanut butter or red velvet Oreos also work. Keep the buttercream and cake the same, and switch the cookie flavor to match your theme.
-
Extra Oreo crunch: Add a layer of crushed Oreos between the cake layers on top of the buttercream. Press them gently into the frosting so they stay in place when you slice.
-
Chocolate intensity: Use a mix of milk and dark chocolate for the drip. Milk chocolate gives a sweeter drip. Dark chocolate gives a richer, less sweet drip. You can also add a pinch of salt to the ganache for balance.
-
Oreo cream filling swirl: For a fun touch, blend the cream centers of some Oreos into a small amount of the buttercream and use it as a ribbon filling between layers. This highlights the classic Oreo flavor.
-
Cookies-and-cream cheesecake layer: Add a thin no-bake cookies-and-cream cheesecake layer between the cakes for a deluxe version. Chill it well before stacking.
-
Add coffee: Mix a teaspoon of instant espresso powder into the cocoa for the cake. Coffee boosts chocolate flavor without making the cake taste like coffee.
-
Make it gluten-free: Use a 1:1 gluten-free baking flour blend for the cake. Pick gluten-free chocolate sandwich cookies to replace Oreos. Check that your chocolate and baking powder are gluten-free.
-
Make it dairy-free: Use a dairy-free butter alternative for both cake and buttercream, and a dairy-free cream for the ganache. Choose dairy-free chocolate. Note that texture and flavor may vary slightly, but it will still be delicious.
-
Simpler frosting option: If you prefer, make a basic American buttercream (butter, powdered sugar, vanilla, splash of milk) and add crushed Oreos. It is sweeter and quicker. The Swiss meringue version is less sweet and silkier, but both work.
-
Naked cake style: Apply only a thin layer of buttercream so you can see the cake layers through the frosting. This rustic look is beautiful and quick.
-
Mini cakes or cupcakes: Bake the batter as cupcakes (about 18–24 standard cupcakes). Bake at 350°F (175°C) for 16–20 minutes, or until a skewer comes out clean. Pipe Oreo buttercream on top and add a mini Oreo.
-
Drip alternatives: Use white chocolate for a contrasting white drip. Tint it with gel color if you want a themed color.
-
Add a caramel layer: Drizzle a thin layer of thick caramel over each buttercream layer before stacking. Sprinkle a pinch of flaky salt for a salted caramel Oreo vibe.
These variations let you tailor the Oreo Cake Recipe to your taste and your event, while keeping the base method easy and reliable.
Frequently Asked Questions About Oreo Cake Recipe
Q: What oven temperature should I use, and how long do I bake the layers?
A: Preheat to 350°F (175°C). For three 6-inch pans, start checking at 20–25 minutes. The cakes are done when a skewer comes out clean or with a few moist crumbs. Do not overbake.
Q: My buttercream curdled after I added the butter. What do I do?
A: Keep whipping. Swiss meringue buttercream often looks curdled before it smooths out. If it is very cool, the butter may be too firm—warm the outside of the bowl with your hands or a warm towel and whip again. If it is too warm and soupy, chill the bowl for 10 minutes and whip.
Q: Can I make this Oreo Cake Recipe ahead of time?
A: Yes. Bake the cake layers a day or two ahead and wrap them well. You can also freeze them for up to 2 months. Make the buttercream a day ahead and keep it in the fridge; bring to room temperature and re-whip before using. You can fully assemble the cake a day in advance. Add the drip and fresh decorations on the day you serve for the best look.
Q: How fine should I crush the Oreos for the buttercream?
A: Crush them into fine crumbs, almost powder, with tiny flecks. Big chunks can clog piping tips and make frosting the sides difficult.
Q: Do I need a thermometer for the egg whites and sugar?
A: It helps but it is not required. Heat until the mixture is warm to the touch and the sugar feels dissolved (rub a little between your fingers—no grit). If using a thermometer, aim for about 160°F (71°C) for food safety and easy whipping.
Q: Can I use different pan sizes?
A: Yes. For two 8-inch pans, increase the bake time slightly (around 25–30 minutes, check early). For cupcakes, bake 16–20 minutes. Always use the skewer test. If you scale the recipe, keep the ingredient ratios the same.
Q: Can I use Dutch-process cocoa or natural cocoa?
A: The recipe lists cocoa powder (100%). Either natural or Dutch-process can work, but baking powder is included, which is flexible. Dutch-process gives a smoother, darker chocolate flavor. Sift it well to remove lumps.
Q: My cake domed in the center. How do I fix it?
A: Trim the dome with a serrated knife to level the layer. Next time, bake with cake strips for even heat, and avoid overmixing. Make sure your oven is not too hot; use an oven thermometer for accuracy.
Q: Why is my cake dry?
A: It may be overbaked or measured with too much flour. Use a scale. Check for doneness early and pull the cake when a skewer has a few moist crumbs. Do not leave the cake in the hot pans too long; turn out after 10–15 minutes to cool on racks.
Q: My ganache drip ran all the way to the bottom. What happened?
A: The ganache was too warm or thin, or the cake was not cold enough. Cool the ganache to slightly warm before dripping, and chill the cake well first. Use less cream for a thicker drip if needed.
Q: Can I color the buttercream?
A: Yes, but Oreo crumbs make it speckled gray. If you want colored swirls, set aside some plain buttercream before you add the Oreo crumbs, tint it, and use it just for piping.
Q: Can I reduce the sugar?
A: You can lower the sugar slightly in the buttercream, but Swiss meringue relies on sugar for structure. For the cake, lowering sugar may affect moisture and texture. If you want less sweetness, use darker chocolate for the drip and add a pinch of salt to balance flavors.
Q: How do I get perfectly smooth sides?
A: Chill the cake after the crumb coat, then apply a thicker final coat. Use a bench scraper and a turntable. Keep your tools clean and warm the scraper slightly with hot water, wiping dry before smoothing.
Q: How do I store leftovers without the cake drying out?
A: Cover the cut side with extra buttercream or plastic wrap touching the exposed cake. Store in an airtight container in the fridge. Bring to room temperature before serving.
Q: Can I make this recipe without a stand mixer?
A: Yes. A hand mixer works for both the cake and the buttercream. It may take a bit longer to whip the meringue, but you will get there. Keep whipping until glossy, stiff peaks form.
With these answers and the clear steps above, you will bake a beautiful, tasty Oreo Cake Recipe that you will be proud to share.
Print
Oreo Cake Recipe
- Total Time: 55 minutes
- Yield: 10-12 servings 1x
- Diet: Vegetarian
Description
A rich and moist chocolate cake layered with silky Oreo buttercream and topped with a glossy chocolate drip, perfect for any celebration.
Ingredients
Scale
- 250g butter
- 250g soft brown sugar
- 1/2 tsp vanilla extract
- 4 eggs
- 160g flour
- 90g cocoa powder
- 10g baking powder
- 5 room temperature egg whites
- 300g caster sugar
- 452g room temperature butter
- 1 tsp vanilla extract
- 2 cups crushed Oreos
- 1 cup chocolate
- 1/4 – 1/2 cup cream
Instructions
- Cream the butter and sugar until pale and fluffy. Add vanilla and eggs one by one. Mix dry ingredients in a separate bowl, then fold into the batter. Divide into three greased and lined 6-inch pans. Bake until a skewer comes out clean. Let cool.
- Heat egg whites and sugar over simmering water until sugar dissolves. Whip until cool and glossy. Gradually add butter, vanilla, and Oreo crumbs. Set aside 1 cup for decoration.
- Level cake layers, stack with buttercream in between, and chill. Apply a crumb coat and refrigerate again.
- Heat chocolate and cream, then cool until pourable. Drip around the edges of the cake.
- Pipe buttercream swirls on top and add more Oreo cookies for garnish.
Notes
Chill the cake after frosting for a more polished finish. Use a warm knife to cut for clean slices.
- Prep Time: 30 minutes
- Cook Time: 25 minutes
- Category: Dessert
- Method: Baking
- Cuisine: American
Nutrition
- Serving Size: 1 slice
- Calories: 450
- Sugar: 35g
- Sodium: 250mg
- Fat: 20g
- Saturated Fat: 10g
- Unsaturated Fat: 8g
- Trans Fat: 0g
- Carbohydrates: 60g
- Fiber: 2g
- Protein: 6g
- Cholesterol: 90mg
Keywords: Oreo cake, chocolate cake, dessert, celebration cake, birthday cake