Follow Me On Social Media!
Homemade Butter Mints
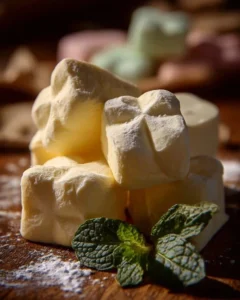
Imagine a sweet, minty burst of flavor that melts in your mouth. Homemade Butter Mints bring a smile to anyone who tastes them. These delightful little candies are perfect for any occasion. Whether it’s a holiday celebration, a birthday party, or just a treat for yourself, these mints are quick and easy to make. You don’t need fancy skills to create them, just a few simple ingredients and a little time. They are creamy, sweet, and have that refreshing peppermint kick that leaves everyone wanting more. Let’s explore how to make these delicious treats!
Why You Should Make This Homemade Butter Mints
Homemade Butter Mints are a great choice for many reasons. First, they are simple to prepare. You only need to follow a few steps, and they come together quickly. This makes them perfect for beginners who may not have much experience in the kitchen. You will impress your family and friends with your candy-making skills!
Second, these mints are budget-friendly. The ingredients are basic and usually found in most kitchens. You won’t have to spend a lot of money to treat yourself or your guests. Plus, making your own mints allows you to customize the flavors and colors, adding your personal touch.
Another appealing quality is their versatility. You can use them for various occasions. Serve them at weddings, birthday parties, or holiday gatherings. They are also great to have around the house for a quick treat after dinner or to freshen your breath.
Finally, these Homemade Butter Mints are simply delicious. The combination of creamy butter, powdered sugar, and refreshing peppermint creates a delightful candy that everyone loves. With each bite, you get a nice balance of sweetness and cool mint flavor.
How to Make Homemade Butter Mints
Making Homemade Butter Mints is an enjoyable process! You will need some basic tools and kitchenware. Here is what you will need:
Tools Needed:
- A large mixing bowl
- An electric mixer (handheld or stand)
- Measuring cups and spoons
- A spatula or mixing spoon
- Parchment paper
- Baking sheet
The steps are straightforward and simple. You beat the butter, mix in the sugar, and add the flavors. In no time, you will have a soft dough ready to shape into delicious mints.
Ingredients for Homemade Butter Mints
Gather the following ingredients to make your Homemade Butter Mints:
- ½ cup unsalted butter, softened
- 4 cups powdered sugar, sifted
- 2 tablespoons heavy cream
- ¼ teaspoon peppermint extract
- ½ teaspoon vanilla extract
- Pinch of salt
- Food coloring (optional)
Each ingredient plays a role in the final product. The butter gives the mints a creamy texture, while the powdered sugar adds sweetness. Heavy cream helps to bind everything together, and the peppermint extract provides that iconic mint flavor. Food coloring is optional but can make your mints look even more fun and festive!
Directions for Making Homemade Butter Mints
Now let’s get into the detailed steps to create your Homemade Butter Mints. Follow these instructions carefully:
-
Beat the Butter: In a large mixing bowl, beat the softened butter until creamy and smooth. Use an electric mixer on medium speed for about 2-3 minutes. This makes the butter fluffy, which is key for your mints.
-
Add Powdered Sugar: Gradually add the sifted powdered sugar to the bowl. Start mixing on low speed to avoid a sugar cloud in your kitchen. Increase the speed once the sugar is combined. Mix until fully incorporated and thick. This may take a few minutes.
-
Incorporate Wet Ingredients: Next, add the heavy cream, peppermint extract, vanilla extract, and a pinch of salt. Beat the mixture on medium speed until it’s smooth and pliable. This is where the magic happens—the mixture transforms into a smooth dough.
-
Add Color (Optional): If you want to make your mints colorful, divide the dough into portions. Add a few drops of food coloring to each portion and knead until evenly distributed. You can make bright green mints for holidays or any color you fancy!
-
Shape the Mints: Roll the dough into small balls or into thin ropes. Then cut them into bite-sized pieces. Place each piece on a parchment-lined baking sheet. This step lets you get creative! You can shape them as balls, squares, or even little shapes if you use cookie cutters.
-
Dry the Mints: Allow the mints to air dry at room temperature for at least 240 minutes or until they feel firm. It’s important not to skip this step; drying helps them set nicely. Once dry, store them in an airtight container to keep them fresh.
How to Serve Homemade Butter Mints
Serving your Homemade Butter Mints is as easy as making them! Here are some tasty ideas:
-
After-Dinner Treat: Place a few mints on a small dessert plate or in a bowl to serve after meals. They are perfect for cleansing your palate with their fresh mint flavor.
-
Party Platters: For parties, arrange your mints in decorative bowls or platters. You can mix different colors for a festive look. This will impress your guests.
-
Gifts: Homemade Butter Mints make delightful gifts. You can package them in small boxes or bags. Tie them up with a ribbon to create a sweet present.
-
Pair with Beverages: These mints pair wonderfully with tea, coffee, or hot chocolate. Serve them alongside a warm drink for an enjoyable experience.
Presenting your mints nicely can make them more appealing. Use colorful plates, add decorations, or place them in fun containers.
How to Store Homemade Butter Mints
Storing your Homemade Butter Mints properly will help keep them fresh. Here are some tips:
-
Airtight Container: After the mints have dried, place them in an airtight container. This will keep them from drying out or absorbing moisture from the air.
-
Room Temperature: Store the mints in a cool, dry place at room temperature. They can last up to 2-3 weeks this way.
-
Refrigeration: If you prefer, you can also refrigerate the mints to help them last longer. Place them in a sealed container when doing so. However, the texture may become firmer.
-
Freezing: While Homemade Butter Mints are best fresh, you can freeze them. Layer them between parchment paper in a freezer-safe container. They will stay good for up to 2-3 months. To use, simply thaw them at room temperature.
Tips for Making the Best Homemade Butter Mints
To ensure your Homemade Butter Mints turn out perfectly, keep these tips in mind:
-
Softening Butter: Make sure your butter is softened. This helps it blend well with the sugar. You can leave it out at room temperature for a couple of hours or microwave it for about 10 seconds if you’re short on time.
-
Sifting Sugar: Sifting the powdered sugar helps remove lumps, creating a smoother mint. It also makes mixing easier, giving a better texture to your mints.
-
Taste Testing: Don’t hesitate to taste your mixture before rolling it out. If you desire a stronger mint flavor, add a little more peppermint extract, adjusting carefully.
-
Avoid Overmixing: Once you add the heavy cream and flavorings, mix just until combined. Overmixing can make the mints tough rather than tender.
-
Experiment with Shapes: Have fun with the shapes you create. You can make seasonal shapes using cookie cutters or just roll them into simple balls.
Variations for Homemade Butter Mints
While Homemade Butter Mints are delightful as they are, you can try these fun variations:
-
Flavored Extracts: Instead of peppermint extract, experiment with other flavors. You could use vanilla, almond, or even citrus extracts like orange or lemon for a different taste.
-
Chocolate Dipped Mints: For a more indulgent treat, dip your mints in melted chocolate. This adds a rich layer of flavor that complements the mintiness.
-
Nut-Free Option: This recipe is already nut-free, making it suitable for many people. Always ensure that any substitutions are also nut-free if you’re catering to allergies.
-
Color Combinations: Mix colors for a marbled effect. Divide the dough, color each portion differently, and then twist them together before rolling. This adds visual appeal.
-
Sugar Free Version: For a healthier option, consider using sugar-free powdered sugar substitutes. Always double-check the flavor and texture that the substitute provides.
Frequently Asked Questions About Homemade Butter Mints
Can I substitute unsalted butter for salted butter?
Yes, you can use salted butter. Just skip adding the pinch of salt to the recipe, or you can reduce the salt to taste. The unsalted butter, however, gives more control over the final sweetness.
Why did my mints turn out too sticky?
If your mints are sticky, it could be because the dough needs more powdered sugar. Try adding a little more sifted sugar until you reach a comfortable consistency that is easier to roll and shape.
Can I make these ahead of time?
Absolutely! Homemade Butter Mints store well, making them great for preparing ahead of time. You can make them days or even weeks in advance, storing them properly, as mentioned earlier.
How do I know when my mints are dry enough?
After about 4 hours, check the mints. They should feel firm to the touch and not stick to your fingers. If they need more time, allow them to dry a bit longer until they firm up completely.
Can I use electric mixers or should I do it all by hand?
Using an electric mixer makes the process quicker and easier. It saves time and gives you a smoother consistency. However, if you prefer, you can mix by hand. Just ensure the butter is really soft for the best results.
By following this guide, you’ll succeed in creating delightful Homemade Butter Mints. Enjoy the process of making these simple, sweet, and minty treats that everyone loves!
Print
Homemade Butter Mints
- Total Time: 255 minutes
- Yield: 10 servings 1x
- Diet: Vegetarian
Description
Delightful, creamy, and minty candies that are quick and easy to make for any occasion.
Ingredients
Scale
- ½ cup unsalted butter, softened
- 4 cups powdered sugar, sifted
- 2 tablespoons heavy cream
- ¼ teaspoon peppermint extract
- ½ teaspoon vanilla extract
- Pinch of salt
- Food coloring (optional)
Instructions
- Beat the softened butter until creamy and smooth.
- Gradually add the sifted powdered sugar and mix until fully incorporated.
- Add heavy cream, peppermint extract, vanilla extract, and a pinch of salt, beating until smooth.
- If using food coloring, divide the dough and knead in the color.
- Shape the dough into small balls or ropes, then cut into bite-sized pieces.
- Place mints on a parchment-lined baking sheet to dry.
- Allow the mints to air dry at room temperature for at least 240 minutes.
Notes
Store dried mints in an airtight container at room temperature for up to 2-3 weeks.
- Prep Time: 15 minutes
- Cook Time: 0 minutes
- Category: Candy
- Method: No Cooking Required
- Cuisine: American
Nutrition
- Serving Size: 1 mint
- Calories: 60
- Sugar: 12g
- Sodium: 5mg
- Fat: 2g
- Saturated Fat: 1g
- Unsaturated Fat: 1g
- Trans Fat: 0g
- Carbohydrates: 14g
- Fiber: 0g
- Protein: 0g
- Cholesterol: 10mg
Keywords: candy, mints, homemade sweets, dessert, easy recipes