Follow Me On Social Media!
Homemade Cheese Ball
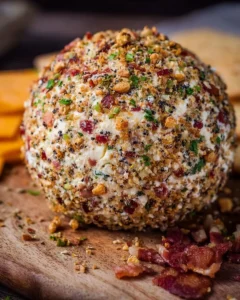
A Homemade Cheese Ball is the kind of snack that makes people smile the moment it hits the table. It is creamy, rich, and full of flavor. It looks fancy, but it is very easy to make. You mix a few simple things, shape the mix into a ball, chill it, and serve. That is it. You can set it out at a party, a holiday gathering, a game day, or even for a simple night in. It always feels special.
This cheese ball uses cream cheese, cheddar cheese, bacon bits, and Ranch seasoning. These bold flavors work well together. The cream cheese makes it smooth. The cheddar gives it a sharp bite. The bacon adds a salty crunch. The Ranch seasoning ties it all together. If you want a little color and freshness, you can add green onions. If you want extra crunch on the outside, you can roll the ball in chopped nuts. It is easy to make it your way.
The best part is the ease. The prep time is short. The ingredients are common. The steps are simple. You do not need a stove or oven. You only need a bowl, a spoon, and some plastic wrap. You can make it ahead of time and keep it cold until guests arrive. You can pair it with crackers, vegetables, pretzels, or bread. It also looks nice on a platter with fruit and meat. It feeds a crowd.
This Homemade Cheese Ball also stretches your budget. A few low-cost items can feed many people when you serve them as a dip or spread. It is great for beginners because it is hard to mess up. It is also very forgiving. If the flavor is too salty, add more cream cheese. If it is too bland, add more cheddar or extra Ranch seasoning. If it is too soft, chill it longer. You can adjust it as you go.
If you love an easy appetizer that feels special and tastes rich, this is it. It is a classic for a reason. The texture is smooth and spreadable. The taste is bold and comforting. The look is neat and tidy. When you bring out a Homemade Cheese Ball, people gather, they chat, and they eat. It sets a warm and happy mood.
Why You Should Make This Homemade Cheese Ball
- It is quick. You can mix the cheese ball in about 10 minutes. The rest of the time is just chilling. You can do other tasks while it firms up in the fridge.
- It is easy. The steps are clear and simple. No cooking is needed. A mixing bowl and a spoon are enough.
- It is a crowd-pleaser. Almost everyone loves cheese, bacon, and Ranch. The flavors are familiar and cozy, so guests dig in right away.
- It is budget-friendly. Cream cheese, cheddar, and bacon bits go a long way, especially when you serve the cheese ball with crackers and veggies.
- It is flexible. You can add or skip ingredients. You can make it mild or spicy. You can coat it in nuts or keep it plain.
- It is make-ahead friendly. You can prepare the cheese ball a day or two before you need it. This frees up time on busy days.
- It looks great. A neat cheese ball with a crunchy nut coat looks festive. It brings color and texture to your snack table.
- It is beginner-friendly. If you want a helpful, low-stress recipe that impresses, this is perfect. You will feel proud of it.
- It works for many events. Serve it at parties, potlucks, holidays, game nights, or family dinners. It fits them all.
- It meets different needs. Skip the nuts for people with nut allergies. Serve with gluten-free crackers if needed. Offer veggie dippers for low-carb guests.
This Homemade Cheese Ball has strong flavor and a creamy base. The Ranch seasoning adds herbs and tang. The cheddar adds sharpness. The bacon bits add savory crunch. If you coat it in nuts, you get extra crunch in every bite. If you add green onions, you get freshness and color.
It also helps you save time. You can make it early in the day and chill it. You can carry it to a friend’s house with no fuss. It packs well. It stays cold and firm. When you are ready to serve, you just unwrap it and place it on a plate.
The cheese ball is also neat to serve. People can slice, spread, or dip. It holds its shape on the table. It does not run or drip. It does not need a heat source. It does not cool off or get soggy like some hot appetizers do. It stays steady and keeps tasting great.
If you want maximum reward for minimum effort, this recipe is a smart pick. It gives you bold taste with very little work. It makes you look like a thoughtful host. It gives your guests something they will enjoy. And it will likely be the first plate to empty.
How to Make Homemade Cheese Ball
Making a Homemade Cheese Ball is simple. You mix, shape, chill, and serve. You do not need special tools. A large mixing bowl and a sturdy spoon or spatula will do the job. If you want to make it even easier, you can use a hand mixer on low speed, but it is not required. Plastic wrap helps you shape the ball and keeps it clean in the fridge. A plate or small tray is good for rolling the ball in chopped nuts if you choose to coat it.
Here is what you need to do:
- Soften the cream cheese so it blends smoothly. You can leave it at room temperature for 30 to 45 minutes. Soft cream cheese mixes better and gives a smoother texture.
- Measure your cheddar, bacon bits, and Ranch seasoning. If using green onions, chop them small so they blend in well. If using nuts for coating, chop them fine so they stick to the surface of the ball.
- Mix the main ingredients in a bowl until they are well combined. You want an even spread of flavor in every bite.
- Shape the mix into a ball. Use plastic wrap to help tighten and smooth the shape. If using nuts, roll the ball in them to coat the outside.
- Wrap the ball and chill it until firm. This helps it hold its shape and makes it easy to slice or spread.
Tools you will want:
- Large mixing bowl
- Sturdy spoon or spatula (or a hand mixer on low)
- Plastic wrap
- Measuring cups and spoons
- Cutting board and knife (for green onions and nuts)
- Plate or shallow dish (for rolling in nuts)
- Serving platter and a small spreading knife
Set yourself up for success by clearing a little counter space. Keep a trash bowl nearby for wrappers and onion ends. Work with clean, dry hands so the ball shapes well. With this simple setup, you will move through the steps fast and smoothly.
Ingredients for Homemade Cheese Ball
8 oz cream cheese, softened, 1 cup shredded cheddar cheese, 1/2 cup bacon bits, 1 packet Ranch seasoning mix, 1/4 cup chopped green onions (optional), 1/2 cup chopped nuts (optional, for coating)
Directions for Making Homemade Cheese Ball
- In a mixing bowl, combine the softened cream cheese, shredded cheddar cheese, bacon bits, and Ranch seasoning mix. Mix until well combined. 2. Form the mixture into a ball shape. 3. Roll the cheese ball in chopped nuts if desired. 4. Wrap in plastic wrap and refrigerate for at least 2 hours to firm up. Serve with crackers or veggies.
How to Serve Homemade Cheese Ball
A Homemade Cheese Ball shines when you serve it with the right sides and a pretty setup. Think about texture and color. You want crisp dippers, soft spreads, and bright items for contrast. A simple platter can look great if you arrange items in neat groups and leave space around the cheese ball.
Good dippers to serve:
- Crackers: buttery crackers, whole wheat crackers, multigrain crackers, or thin, crisp water crackers. The mild flavor of the cracker lets the cheese ball stand out.
- Bread: sliced baguette, toasted crostini, rye rounds, or small pita wedges.
- Pretzels: mini pretzels, pretzel chips, or pretzel rods. The salt on pretzels pairs well with the cheesy, creamy flavor.
- Veggies: carrot sticks, celery sticks, cucumber rounds, bell pepper strips, radishes, cherry tomatoes, and snap peas. Fresh veggies add crunch and color.
- Fruit: apple slices, pear slices, or red grapes. A little sweetness balances the salty and creamy cheese ball.
- Meats: thin slices of salami, prosciutto, or turkey. A small amount gives a nice savory mix for charcuterie-style boards.
Tips for arranging your platter:
- Place the cheese ball in the center or just off-center. This creates a clear focal point.
- Add dippers in groups around it. Group by type. For example, place crackers in one section, pretzels in another, and veggies in another.
- Use small bowls for items like nuts or grapes so they do not roll around.
- Make it colorful. Mix green cucumbers, red bell peppers, and orange carrots. Add green onions as garnish for a fresh look.
- Give people space to work. Do not crowd the platter. Leave room for a small spreading knife or two.
- Add a small sign or marker if you have guests with allergies. For example, write “contains nuts” if you used a nut coating.
Garnish ideas:
- Sprinkle chopped green onions or parsley around the base of the cheese ball.
- Add a few bacon bits on top right before serving.
- Drizzle a tiny bit of honey on the platter near the fruit section if you want sweet contrast. Do not pour honey on the cheese ball itself, as it can make it sticky.
Portioning and serving tips:
- Offer two spreading knives if you have a big group. This reduces waiting.
- If the cheese ball is very firm, let it sit at room temperature for 10 to 15 minutes before guests arrive. This makes it easier to spread.
- Slice a small wedge out of the cheese ball before you set it out. This gives guests a clue that they can dig in.
Drink pairings:
- Wine: A crisp white wine like Sauvignon Blanc or Pinot Grigio cuts the richness. A light red like Pinot Noir also works. For bold taste, try a dry sparkling wine. The bubbles lift the creamy texture.
- Beer: Pilsner, pale ale, or light lager pair well. If you love darker beers, a brown ale matches the nutty notes if you use a nut coating.
- Cocktails: A light gin and tonic or a simple vodka soda keeps the focus on the cheese ball.
- Non-alcoholic: Sparkling water with lemon, iced tea, or apple cider all work and are refreshing.
Serving for different occasions:
- Casual night in: Serve with crackers, carrot sticks, and pretzels on a small cutting board.
- Game day: Add sturdy dippers like pretzel chips and thick-cut celery sticks so people can scoop fast.
- Holiday party: Roll the cheese ball in chopped pecans or pistachios for a festive look. Add red grapes and rosemary sprigs for color.
- Potluck: Keep the cheese ball chilled during transport. Bring extra crackers in a separate bag so they stay crisp.
With these tips, your Homemade Cheese Ball will look nice and taste even better. The right dippers and a tidy layout will make your guests reach for more.
How to Store Homemade Cheese Ball
Proper storage keeps your Homemade Cheese Ball safe and tasty. Because it has dairy and bacon, it must stay cold.
Short-term storage:
- Wrap the cheese ball tightly in plastic wrap. Press out any air. Air can dry out the surface and affect flavor.
- Place the wrapped ball in an airtight container if you can. This protects it from fridge smells.
- Store it in the refrigerator for up to 5 days. If you used fresh green onions, aim to serve it within 3 to 4 days for best flavor and texture.
Serving safety:
- Do not leave the cheese ball at room temperature for more than 2 hours. If the room is very warm (above 90°F/32°C), limit it to 1 hour.
- If you plan a long event, set out a portion and keep the rest chilled. Refill the platter as needed.
Make-ahead tips:
- You can make the cheese ball up to 2 days in advance. Keep it wrapped and chilled. If you plan to roll it in nuts, wait to coat it until the day you serve. This keeps the nuts crisp.
- If the cheese ball firms up too much, let it sit out for 10 to 15 minutes before serving so it spreads easily.
Freezing:
- You can freeze the cheese ball for up to 1 month for best quality. For the best texture, freeze it without the nut coating. Wrap it in plastic wrap, then add a layer of foil or place it in a freezer bag.
- Thaw it in the refrigerator for 12 to 24 hours. After it thaws, pat it dry if any moisture appears on the surface. Shape it gently, then roll it in nuts if you want a coating.
- Note that freezing may slightly change the texture. It can become a bit crumbly. Mixing or gently pressing it back into a smooth shape after thawing helps.
Leftovers:
- If you have leftover cheese ball after serving, check the time it sat out. If it was out for less than 2 hours, rewrap it tightly and refrigerate.
- You can repurpose leftovers by spreading them on toast, stuffing celery sticks, or melting small scoops inside omelets or breakfast burritos.
These storage steps keep your cheese ball safe, fresh, and delicious for days.
Tips for Making the Best Homemade Cheese Ball
- Soften your cream cheese. Cold cream cheese is hard to mix and can leave lumps. Let it sit at room temperature for 30 to 45 minutes. If you are in a hurry, cut it into cubes to speed this up.
- Use freshly shredded cheddar if possible. Pre-shredded cheese often has anti-caking powder. Freshly shredded cheese melts and blends better, and it gives richer flavor.
- Mix well, but not too hard. Stir until everything looks even. You want the bacon bits and cheese spread throughout. Do not whip air into it. A simple fold and press motion works best.
- Taste and adjust before shaping. Take a small taste after mixing. If you want more sharpness, add a little extra cheddar. If it is too salty, add more cream cheese. If you want more herb flavor, add a pinch of dried dill or extra Ranch seasoning.
- Chop add-ins small. Chop green onions and nuts finely. Small pieces stick well and give even flavor without big chunks.
- Keep your hands clean and slightly damp when shaping. A light touch keeps the ball smooth. You can also shape the ball inside plastic wrap. Place the mixture on the wrap, pull up the sides, and twist to tighten into a ball.
- Chill long enough. A full 2 hours in the fridge helps the ball set and makes it easier to slice or spread. Overnight is even better for flavor.
- Coat right before serving for the best crunch. If you use nuts, roll the cheese ball in them on the day you serve. This keeps the coating crisp.
- Toast the nuts for extra flavor. If you have time, toast the chopped nuts in a dry pan for 3 to 5 minutes. Let them cool fully before rolling the cheese ball in them.
- Keep it neat. Roll the ball on a sheet of parchment or a plate so you can catch any falling bits and press them back on.
- Offer a variety of dippers. Place at least one crunchy option (like crackers) and one fresh option (like celery). This helps guests with different tastes and diets.
- Make two smaller balls if serving a big group. You can set one out and keep one chilled. This keeps the serving area tidy and the cheese fresh.
- Avoid watery add-ins. Ingredients with lots of moisture can make the cheese ball soft. If you add extras like bell peppers, dry them well first.
- Watch the salt. Bacon bits and Ranch seasoning are both salty. Taste before adding any extra salt.
- Use a lined container if traveling. Place the wrapped cheese ball in a snug container with a bit of paper towel under it to catch moisture. Keep an ice pack with it to stay cold during transport.
- For easy spreading, score the surface. Use a knife to make a small cut on the top. This helps guests get the first scoop and encourages people to start.
- Clean the knife often. Keep a napkin near the platter. A clean knife makes smooth spreads and keeps the platter pretty.
These simple tips help you get the best texture, clean look, and balanced flavor every time.
Variations for Homemade Cheese Ball
You can change this Homemade Cheese Ball to fit your taste and your guests’ needs. Here are ideas to try:
Flavor swaps:
- Spicy: Add 1 to 2 teaspoons of hot sauce, a pinch of cayenne, or diced jalapeños. You can also use pepper jack in place of some cheddar.
- Smoky: Add 1/2 teaspoon smoked paprika or use smoked cheddar. Use smoked bacon bits for deeper flavor.
- Herbed: Mix in chopped fresh parsley, dill, and chives. This adds color and fresh taste.
- Garlic lovers: Add 1 small clove of minced garlic or 1/4 teaspoon garlic powder. A little goes a long way.
- Tangy: Stir in 1 to 2 teaspoons of lemon juice or a spoon of sour cream for a soft tang.
Coating ideas:
- Nuts: Pecans, walnuts, almonds, or pistachios. Chop them fine. Toast them for extra flavor.
- Seeds: Sesame seeds, poppy seeds, or everything bagel seasoning for a crunchy, savory coat.
- Herbs: Chopped parsley, dill, or chives for a fresh green look.
- Bacon outside: Press extra bacon bits on the outside instead of nuts for full-on bacon flavor.
- Crushed crackers: Roll in crushed buttery crackers for a crisp, salty coat.
Add-in swaps:
- Cheese: Use a blend. Try Colby jack, Monterey jack, pepper jack, or a little blue cheese mixed with cheddar for bold flavor.
- Meat: Use real cooked, crumbled bacon instead of bacon bits. Make sure it is crisp and cooled before mixing.
- Veggies: Add finely chopped bell peppers, sun-dried tomatoes, or olives. Pat them dry to avoid extra moisture.
- Sweet touch: Mix in a few chopped dried cranberries or apricots for a sweet-salty balance. This works well for holidays.
Diet-friendly ideas:
- Vegetarian: Skip the bacon bits. Add toasted nuts inside the mix for crunch. Or add more green onions and herbs.
- Gluten-free: Most ingredients are gluten-free, but check the Ranch seasoning label. Serve with gluten-free crackers or veggie dippers.
- Lower fat: Use Neufchâtel cheese (1/3 less fat cream cheese). It still gives a creamy texture with fewer calories.
- Low-carb/keto: Skip the nut coating if you want fewer carbs, or use chopped pecans (a keto-friendly choice). Serve with low-carb veggie dippers like celery and cucumber.
Different shapes and sizes:
- Cheese log: Shape the mixture into a log instead of a ball. It is easier to slice and looks elegant.
- Mini cheese balls: Make bite-size balls and roll each in a different coating. Stick a pretzel rod in each for easy grabbing.
- Layered dip: Press the mixture into a shallow dish and serve as a spread. Sprinkle the top with green onions and bacon bits.
Make it seasonal:
- Fall/holiday: Use chopped pecans and dried cranberries on the outside. Garnish with rosemary sprigs.
- Spring: Coat with fresh chopped herbs and add thinly sliced radishes on the platter.
- Game day: Mix in jalapeños and roll in crushed tortilla chips for a spicy crunch.
These variations show how flexible a Homemade Cheese Ball can be. Start with the base. Then swap add-ins, coatings, and shapes to make it your own.
Frequently Asked Questions About Homemade Cheese Ball
-
Can I use low-fat cream cheese?
Yes. You can use Neufchâtel cheese (1/3 less fat). It gives a creamy texture and tastes great. The cheese ball may be slightly softer, so chill it well. -
Can I make it without bacon?
Yes. Skip the bacon bits for a vegetarian version. Add more cheddar, green onions, or chopped nuts inside the mix for extra flavor and texture. -
What can I use instead of Ranch seasoning?
You can mix your own. Try 1 teaspoon dried parsley, 1/2 teaspoon dried dill, 1/2 teaspoon onion powder, 1/2 teaspoon garlic powder, 1/4 teaspoon black pepper, and a pinch of salt. Adjust to taste. -
Why is my cheese ball too soft?
It may be too warm or have too much moisture. Chill it for at least 2 hours. If it is still soft, mix in a little more shredded cheddar to firm it up. Avoid wet add-ins or dry them well before mixing. -
Why is my cheese ball too salty?
Ranch seasoning and bacon bits add salt. Add more cream cheese to balance it. You can also add a squeeze of lemon juice to brighten the flavor, which can make the salt less intense. -
Can I use real bacon instead of bacon bits?
Yes. Cook bacon until crisp and let it cool. Crumble it finely. Use the same amount as bacon bits. Real bacon adds big flavor and nice crunch. -
How far ahead can I make a cheese ball?
You can make it up to 2 days ahead. Keep it wrapped tightly and refrigerated. For the best look and crunch, add the nut coating on the day you serve. -
Can I freeze a cheese ball?
Yes, for up to 1 month. Freeze it without the nut coating for best texture. Wrap it well. Thaw in the fridge 12 to 24 hours before serving. Then roll in nuts if you want a coating. -
How long can a cheese ball sit out?
Keep it out for no more than 2 hours. If it is hot in the room (above 90°F/32°C), keep it out for only 1 hour. After that, rewrap and refrigerate. -
What should I serve with a Homemade Cheese Ball?
Serve crackers, pretzels, baguette slices, and fresh veggies like carrots, celery, cucumbers, and bell peppers. Add fruit like grapes or apple slices for a sweet contrast. -
Can I make it spicy?
Yes. Add cayenne, hot sauce, or diced jalapeños. You can also use pepper jack cheese for extra heat. -
My coating will not stick. What should I do?
Pat the cheese ball dry if needed. Let it sit at room temperature for 5 minutes to soften the surface slightly. Press the nuts or coating gently but firmly. Chop the nuts small so they adhere well. -
Can I shape it into a log instead of a ball?
Yes. Shaping it into a log makes it easy to slice and spread. The coating also sticks well on a log. Chill it well so it holds its shape. -
Is this recipe gluten-free?
The base ingredients usually are, but always check your Ranch seasoning label. Use gluten-free crackers or serve with veggie dippers for a fully gluten-free platter. -
Can I add sweet elements?
Yes. Add a handful of chopped dried cranberries or apricots to the mix, or roll the outside in a mix of chopped nuts and dried fruit. Serve with apple slices for a sweet-savory bite. -
How do I get a smooth, round shape?
Shape the mixture inside plastic wrap. Gather the wrap around it and twist the top to tighten. Roll it gently on the counter to smooth it. Chill to set the shape. -
What if I do not have nuts for coating?
Skip the coating, or use crushed crackers, bacon bits, herb mix, or everything bagel seasoning. The cheese ball will still taste great. -
Can I use a food processor?
You can, but use short pulses. Over-processing can make the texture too soft. A bowl and spoon or a hand mixer on low are easier to control. -
What if I do not like onions?
Skip the green onions. The cheese ball tastes great without them. You can add a little chopped parsley for a milder green touch. -
How do I transport a cheese ball?
Wrap it tightly and place it in a snug container. Keep it cold with an ice pack in an insulated bag. Add the coating after you arrive if you want it extra crisp.
With these answers, you can adapt, fix, or plan your Homemade Cheese Ball with ease. This recipe is simple, flexible, and very satisfying. Enjoy making it and sharing it with friends and family.
Print
Homemade Cheese Ball
- Total Time: 130 minutes
- Yield: 8 servings 1x
- Diet: Vegetarian
Description
A creamy and flavorful cheese ball made with common ingredients like cream cheese, cheddar, bacon bits, and Ranch seasoning. Perfect for parties and gatherings.
Ingredients
Scale
- 8 oz cream cheese, softened
- 1 cup shredded cheddar cheese
- 1/2 cup bacon bits
- 1 packet Ranch seasoning mix
- 1/4 cup chopped green onions (optional)
- 1/2 cup chopped nuts (optional, for coating)
Instructions
- Soften the cream cheese to blend smoothly.
- Measure and chop cheddar, bacon bits, and Ranch seasoning. If using green onions and nuts, chop them finely.
- In a mixing bowl, combine cream cheese, cheddar, bacon bits, and Ranch seasoning. Mix well.
- Shape the mixture into a ball, using plastic wrap to help form it.
- If desired, roll the cheese ball in chopped nuts for coating.
- Wrap in plastic wrap and chill for at least 2 hours to firm up.
- Serve with crackers or vegetables.
Notes
Serve with a variety of dippers like crackers, pretzels, and fresh veggies. Feel free to adjust seasoning and add-ins to taste.
- Prep Time: 10 minutes
- Cook Time: 120 minutes
- Category: Appetizer
- Method: No Cook
- Cuisine: American
Nutrition
- Serving Size: 1 serving
- Calories: 250
- Sugar: 3g
- Sodium: 600mg
- Fat: 20g
- Saturated Fat: 10g
- Unsaturated Fat: 8g
- Trans Fat: 0g
- Carbohydrates: 5g
- Fiber: 0g
- Protein: 8g
- Cholesterol: 40mg
Keywords: cheese ball, appetizer, party food, easy recipe